Can’t print pdf files after Windows 11 update? Apply these solutions
While trying to print a portable document format (PDF) file from Adobe Reader, the file does not print? Here this post we help to resolve the issue applicable on Windows 10, 8.1 and 7.

Having difficulties printing PDF files directly from Adobe Acrobat Reader on Windows 11? can’t print pdf but can print everything else? You are not alone a number of Windows 11 users report each time click Print on Adobe doesn’t see any error message it just doesn’t print at all. Few others can’t print PDF files since upgrading to Windows 11 version 22H2. Basically, a wrong file format or an incompatible printer driver is the main reason for this problem. If you are also struggling with similar problem this guide is going to help you solve this problem step by step.
Can’t Print PDF Files from Adobe Reader
- Check the printer for any kind of problems and make sure the USB cable between the computer and printer is connected properly.
- Check if any tasks are pending in the print queue if there we recommend clear the print queue first.
- Reboot your computer to fix the problem if a temporary glitch causes the issue. Now open the file with Adobe Acrobat Reader Try to print the document again.
- Again it’s recommended to Make sure the latest Windows 11 updates are installed on your PC.
- Print a different pdf file to determine if the issue occurs with a specific pdf file or all pdf files, or if the printer’s memory is full.
We have to look at both printer and problems with Adobe Acrobat Reader to find out and resolve the issue. In cause, if you are able to print other documents only having problem printing PDF documents we recommend scroll down to Adobe Acrobat Reader troubleshooting part.
Set your Printer as the Default Printer
- Open control panel
- Make sure that the View By option is set to Large Icons and Select Devices and Printers.
- If there is a green checkmark beside your printer, it means that it is already set as the default device for printing. Otherwise, you should right-click your printer, then select the ‘Set as a default printer option.
Update printer driver
You might encounter problems printing PDF documents after the Windows 11 update because of the old/incompatible printer driver.
- Open the device manager, Expand printers, Right-click on the currently installed printer driver and select update driver software.
- On the next page select the option Search automatically for updated driver software and follow on-screen instructions.
- Also, you can Go to the official websites of your printer manufacturers, like HP, Dell, Canon, or Brother.
- Locate the specific driver-download page and find the correct latest driver for your printer.
- Download and install the driver on your computer.
- Restart your computer and try to print your PDF file in Adobe to see if it works.
Reinstall printer driver
Temporary glitches with the printer or its driver also may prevent printing PDF documents on Windows 11. Removing the problematic printer from your computer, and adding it again can solve your problem.
- Scan for printer & scanner and select the first result,
- Now select the printer and click the remove option, and follow the on-screen instructions to complete the task.
- Once done disconnect the printer (USB cable) and restart your PC to completely remove its drivers.
- Now again connect the printer (USB cable) and run the printer driver (that you have downloaded from its official website)
- Make sure you have set the printer as the default printer and try to print the PDF document.
Clear a Printer Spooler
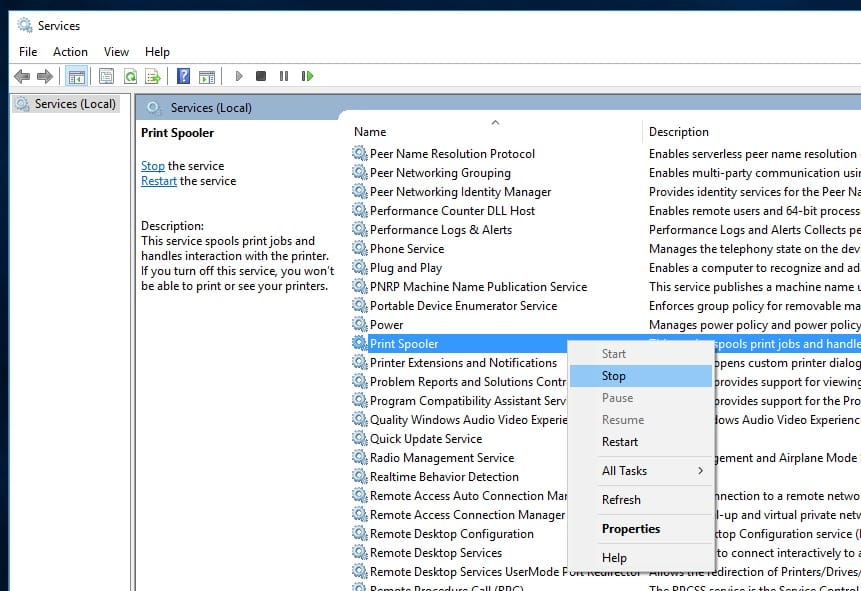
- Open the Windows services console using services.msc
- Scroll down and locate the print spooler service,
- Right-click on print spooler service and select stop

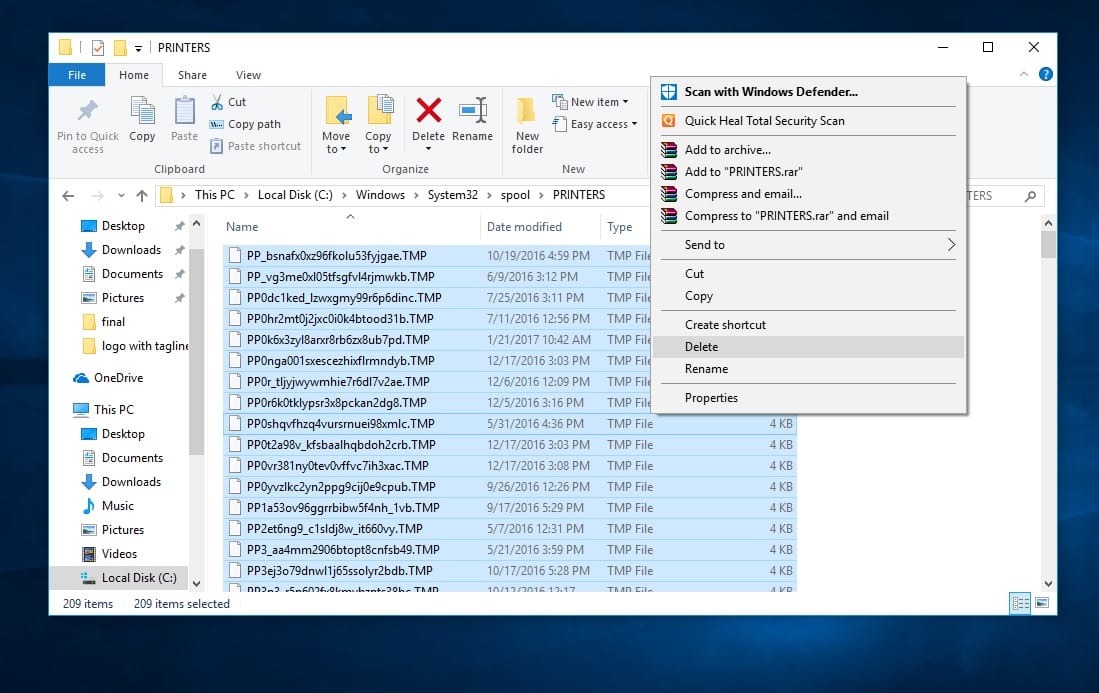
- Now open Windows Explorer and navigate C:\Windows\System32\spool\PRINTERS,
- Press Ctrl + A to select all and hit del key on the keyboard to delete all files and folders inside the printer’s folder.

Now again open the Windows services console and restart the print spooler service. Let’s check if everything working as expected.
Change the default program
Make sure Adobe Acrobat Reader DC is the default program for viewing pdf files.
- Open the Control panel, and then click Programs.
- Now click Default Programs, and then click Associate a file type protocol with a program.
- The Set associations window displays.
- Find and select .pdf, and then click Change Program.
- Click Other Programs, select Adobe Acrobat Reader DC from the list of results, click OK, and then click Save.
- Try printing the original pdf file again.
Check if the PDF file is corrupted
If the PDF file is corrupted (during the file transfer process) in such case you might encounter problems open or printing PDF files.
- Open the problematic PDF file in the PDF editor.
- Choose File > Print and choose the option to save the file as PDF.
- Open the new PDF file and try to print it again.
Reinstall Adobe reader
Still need help let’s reinstall the Adobe Reader that probably helps fix the issue.
- Press Windows Key + I to open Settings then click on Apps.
- From the left hand make sure to select Apps & features.
- Now scroll down and locate Adobe Reader click it,
- Here you will get the uninstall button, click on it to remove Adobe Reader from Windows 11.
- Now download the latest version of Adobe Acrobat Reader from the official website.
- Install the latest version of Acrobat Reader on your PC and Reboot your PC.
- Again try to print the PDF file and this time you will be able to print it without any issues.
