You can run the “Memory diagnostic tool” on Windows 11 to check for possible errors with Random Access Memory (RAM) on your computer. If your system experiences a random Blue Screen of Death (BSoD), freezes, or reboots frequently, you should run a memory diagnostic tool to discard the problem. Memory issues not only make your computer unstable but also could cause data corruption and other errors. Here this article explores, how to use Memory diagnostic tool to check possible memory problems on Windows 11.
The Memory Diagnostic Tools runs a comprehensive test and displays the test results so you can take immediate action.
Run Windows Memory Diagnostic Tool
If you are struggling to resolve memory problems on your computer, Run the memory diagnostic tool by following the steps below. The tool helps you test the RAM (Random Access Memory) and troubleshoot all memory problems.
- Press Windows key + R, type mdsched.exe and click ok to open Windows memory diagnostic tool
- Also, you can press the Windows key + S, type memory diagnostic and select it from search results.
- Now you have to choose between two options: ‘Restart now and check the problems’ or ‘Check for problems the next time I restart my computer.


- If you select the first option your PC restarts immediately and starts testing memory errors. (make sure to save all your work)
- Or you can select Check for problems the next time I start my computer to run the Memory diagnostic tool next time you reboot your PC.
When you restart Windows, the Memory Diagnostics Tool automatically starts running tests on your PC’s memory. Be patient as it might take some time to finish running the diagnostic tests.
The system will also display the progress bar and the status notification during the process.


Advanced options for running the Memory Diagnostics Tool:
By default, the tool will run a test called the Standard test, which might take around 10 minutes to complete. Here you can press “F1” key to open the Windows Memory Diagnostic page to change the scan options. And use the TAB key to change cache settings in the Windows Memory Diagnostic tool.
You can adjust the following settings:
- Test mix. Choose what type of test you want to run: Basic, Standard, or Extended. The choices are described in the tool.
- Cache. Choose the cache setting you want for each test: Default, On, or Off.
- Pass count. Type the number of times you want to repeat the test.


Now After making changes for advance options press F10 To Apply changes and Start the Test.
It might take several minutes for the tool to finish checking your computer’s memory.
Once The process is finished, your computer will reboot and return to the Windows desktop. Now When you log on, It will show you the Result.


But sometimes, You may not see the result automatically. In that case, You have to find it manually. The result can be found in the Windows Event Viewer.
Check memory diagnostic results
To Check Memory Diagnostic Test Results
- Press Windows key + R type ‘eventvwr.msc’ into the run dialog box and press enter
- Also, you can right-click the start button and select ‘Event Viewer’ to open the Windows Event Viewer Screen.
Locate and expand ‘Windows Logs’ then select system. You will see all system logs list in the middle of the Window, The list may be huge. It is very difficult to find the result from it. So, You have to filter the result so that you can find it very easily Click ‘Find’ on the right pane.
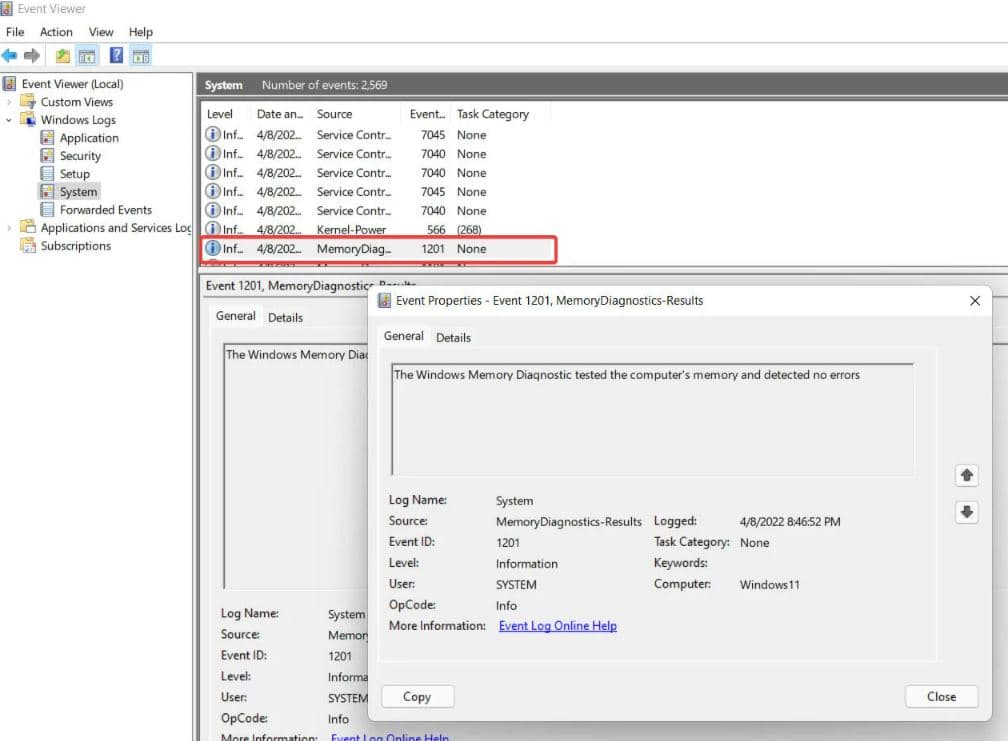
On the box that pops up, type ‘MemoryDiagnostic’, then click ‘Find Next’. The test results will open at the bottom of that same Window.
Double-click the event log entry to see the details of whether there are any errors detected.