Solved: Windows 10 100 disk usage on startup (5 Working solutions)

Have you notice Windows 10 running slow, became unresponsive, or High Disk usage after the Windows 10 Feature upgrade? When you start your PC/Laptop it’s running very slow, Not responding, and Windows not respond to mouse clicks. A number of users report windows 10 100% disk usage on startup after installing the latest updates.
The Disk usage stays at 100% in Task Manager for a while whenever I switch my laptop on, slowing down the system and making it very unresponsive. It then goes away and the usage drops to 0 – 30% levels.
There are several reasons that cause windows 10 high disk usage, the problem with the disk drive, incorrect virtual memory setup, windows service stuck running, virus malware infection and more. If you are struggling with this problem, Here 7 effective solutions you may apply.
Windows 10 100 disk usage
First of all disconnect all external devices that fix the problem if any driver conflict causes the problem.
Perform a full system scan with the latest updated antivirus to remove any virus/malware infection.
Start Windows 10 clean boot state to determine if any third-party service conflict causing the problem.
- Press Windows key+ito open Settings, then select Privacy.
- Under Privacy, select Feedback & diagnostics.
- Under Diagnostic and usage data, change Send your device data to Microsoft to Enhanced or Basic.
- Close the Settings.
- Check this helps to fix the high disk usage problem.
Disable Windows tips
- Open windows settings using the keyboard shortcut Windows + I,
- Click on the system then notifications & Actions.
- Turn off Get tips, tricks, and suggestions as you use the Windows toggle button.
Disable Windows search and superfetch service
- Press Windows + R, type services.msc and ok.
- Now, look for Windows Search in the list.
- Right-click the Windows Search service and go to Properties.
- Under the General tab, set the Startup type to Disabled.
- And stop the service next to service status.
- Click apply and ok to save changes.
- Do the same with superfetch service and BITs service.
- Now check there is no more 100% disk usage at startup.

Perform a disk check
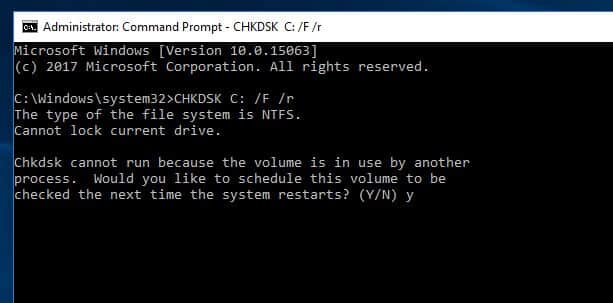
A good way to spot issues with your Windows installation is performing the disk check using your computer’s inbuilt disk check utility. To do so and, take care of Windows 10 100 disk usage, perform the following simple steps one by one:
- Type cmd on start menu search, Right-click on command prompt and select run as administrator.
- Now type the following command in the command prompt and hit enter:
chkdsk /f /r.

- Type Y to confirm the disk check during the next restart.
- Close everything and restart windows, disk check utility will run.
- After complete the scanning and repair process, this will restart the windows.
- Now check the disk usage again in Task Manager to see if the problem has been fixed.
Reset virtual memory for 100 disk usage fix
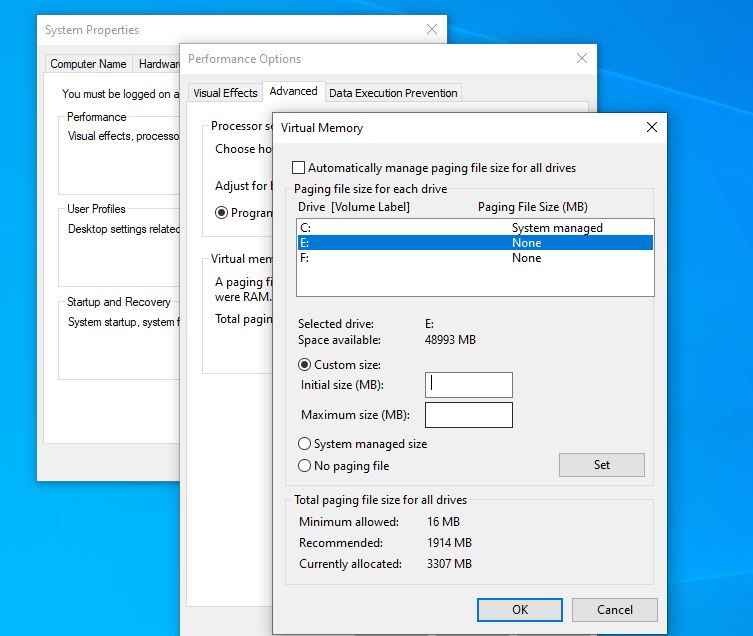
You might have come across the term virtual memory while reading about RAM management in Windows 10. When your computer’s RAM isn’t enough for processes, Windows stores files in the virtual memory and keeps swapping them to RAM when needed. You can also reset Windows 10 virtual memory to fix high disk usage.
To reset virtual memory:
- On your keyboard, press the Windows key and Pause/ Break key at the same time.
- Then choose Advanced System Settings on the left panel.
- Go to the Advanced tab, then click Settings.
- Go to the Advanced tab again, and choose Change… in the Virtual memory section
- Ensure the Automatically manage paging file size for all drives checkbox is NOT ticked.
- Select your windows drive (the hard drive or partition that has Windows installed on it – usually C:), and enter an Initial size and Maximum size for your virtual memory:
- Initial size – This value varies, depending on your computer. If you’re not sure what value to use, just enter whatever the number is in the Recommended category.
- Maximum size – Don’t set this value too high. It should be about 1.5 times the size of your physical RAM. e.g. A PC with 4 GB (4096 MB) of RAM should have no more than about 6,144 MB virtual memory (4096 MB x 1.5).
- Once you’ve entered your virtual memory values, click Set, then click OK to continue.
- Once restart windows and check there is no more windows 10 100 disk usage problem.

Check if Chrome or skype causing High disk usage
For Google Chrome
- Open Chrome browser, type chrome://settings/ on the address bar and hit enter.
- Scroll down and click Show Advanced Settings > Privacy.
- Here, untick the option called Prefetch resources to load pages more quickly
Skype: ( ignore this if you are not using skype)
- Close the Skype app. Right-click its icon in the taskbar and click Quit or you can use the Task Manager.
- Now, open This PC or My Computer and navigate to C:\Program Files (x86)\Skype\Phone\
- Right-click the file Skype.exe and go to Properties.
- Under the Security tab, select ALL APPLICATION PACKAGES and click Edit.
- On the next box that appears, select ALL APPLICATION PACKAGES, and tick the Allow checkbox for Write permissions.
- Click OK to save and continue. Click OK again.
- Now check, there is no more Windows 10 100 disk usage problem.
Check StorAHCI.sys driver bug
Sometimes Windows 10 100% disk usage problem might also be caused by some Advanced Host Controller Interface PCI-Express (AHCI PCIe) models running with the inbox StorAHCI.sys driver due to a firmware bug. Here’s how to determine if this is your problem and fix it:
- Press Windows+ R, type devmgmt.msc and ok to open device manager.
- Expand the IDE ATA/ATAPI Controllers category, and double-click the AHCI controller.
- Go to the Driver tab and click Driver Details.
- If you can see storahci.sys stored in a path of system32 folder, then you are running the inbox AHCI driver.

Close the Driver Details window and go to the Details tab. From the drop-down menu, select Device Instance Path. Make note of the path, starting from VEN_.

Now press Windows + R, type regedit and ok to open the windows registry editor.
Navigate to the following key:
HKEY_LOCAL_MACHINE\System\CurrentControlSet\Enum\PCI\ <AHCI Controller>\<RandomNumber>\Device Parameters\Interrupt Management\MessageSignaledInterruptProperties
Here <AHCI Controller> is the number you noted down previously.
Double click the MSISupported key and change the value to 0.

That’s all, restart windows and check there is no more, High Disk usage on Windows 10. Did these solutions help to fix Windows 10 100 disk usage problem? let us know on comments below.
