Windows 10 Running slow? Here how To Make Your Windows 10 Faster

Windows 10 running slow, startup and shutdown take time after update 1903? Programs won’t open even Windows don’t recognize mouse clicks at startup. Most of the time the issue can be caused due to driver incompatibility or any third-party software conflict. Whatever the Reason for windows slow performance, here we have 6 Tips to Fix Slow Boot Times and optimize Windows 10 performance.
Fix Windows 10 Slow Performance
There are three basic categories to speed up and optimize Windows 10 performance: operating system (OS) tweaks, software enhancements, and app replacement or removal. Let’s start with advanced tweaks to fix slow boot times on windows 10.
Press Ctrl+Shift+Esc keys together to bring up the Task Manager dialog box.
Go to the Startup tab, Select the program that you don’s use often and click on the Disable button.
Perform Clean boot to avoid any third-party software conflict.
A clean boot helps eliminate software conflicts. To help troubleshoot error messages and other issues, you can start Windows by using a minimal set of drivers and startup programs. This kind of startup is known as a “clean boot.” Putting your system in Clean Boot state helps in identifying if any third-party applications or startup items are causing the issue. Read How to perform a clean boot in Windows 10, 8.1 and 7.
Disable Fast Boot
Windows 10 fast startup feature was introduced to reduce startup time by pre-loading some boot information before your PC shuts off. While the name sounds promising, it’s caused issues for a lot of people. And users report Disable fast startup option help them to optimize Windows 10 start time.
- Open Control Panel,
- Search for and select Power Options,
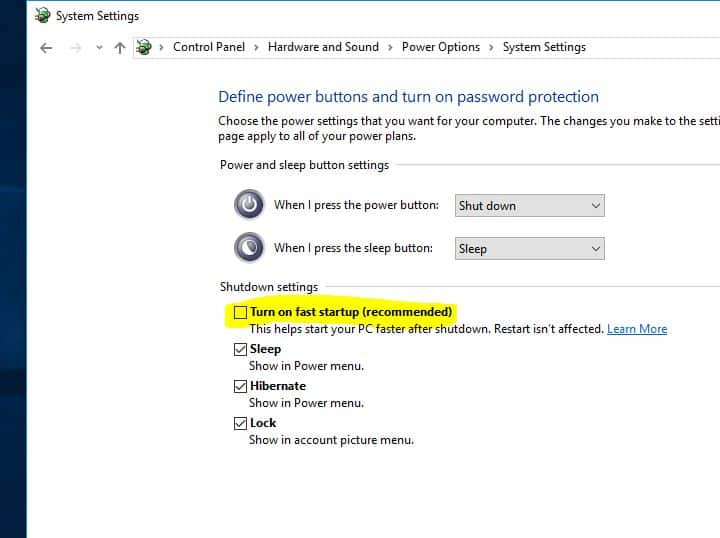
- Click Choose what the power buttons do on the left sidebar.
- Next click Change settings that are currently unavailable
- Now, untick Turn on fast startup (recommended) and Save Changes to disable this setting.

Adjust Virtual Memory
The pagefile is a virtual memory file stored in the root folder of your Windows drive. When your system runs low on memory (Random Access Memory), it will move some memory to pagefile.sys in order to run smoothly. The file is managed automatically by PC But you can adjust Virtual memory size for better PC performance.
- Press Windows + R, type sysdm.cpl and hit the enter key.
- On System, properties move to the Advanced tab and click Settings under Performance.
- On performance, options move to the Advanced tab
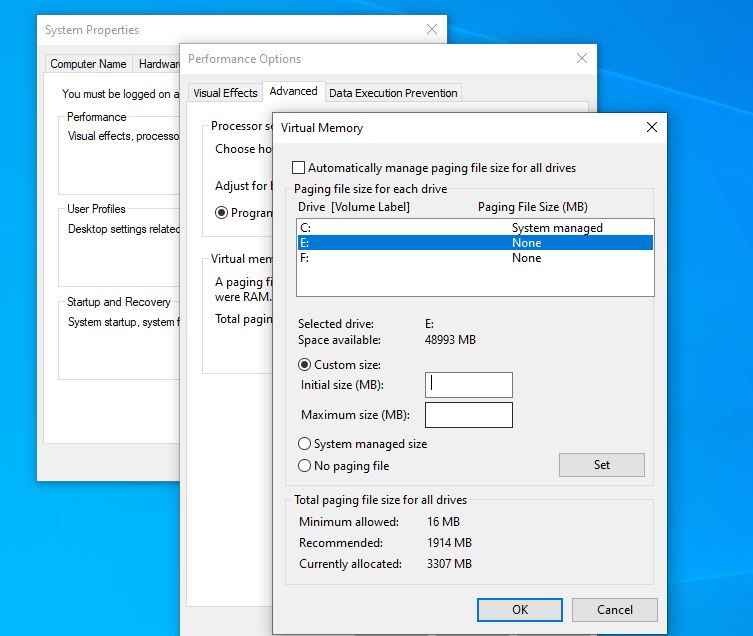
- Click on the Change button under Virtual Memory (A new virtual memory window appears)
- uncheck Automatically manage paging file size for all drives.
- Select the C: drive and then click the radio button for Custom size.
- Then set the Initial size (MB) to the size of your RAM and Maximum size (MB) to the Recommended size
- After that, click the Set button.
- Click OK button.
- Restart your PC for the changes to take effect.

Set High Performance Power Plan
The ‘High Performance’ mode in Power options helps you make the best out of your PC. The CPU can utilize its full potential, while the high-performance mode prevents various components like hard drives, WiFi cards, etc from going into power-saving states.
Follow the steps below to Enable High-performance mode
- Open the Control panel,
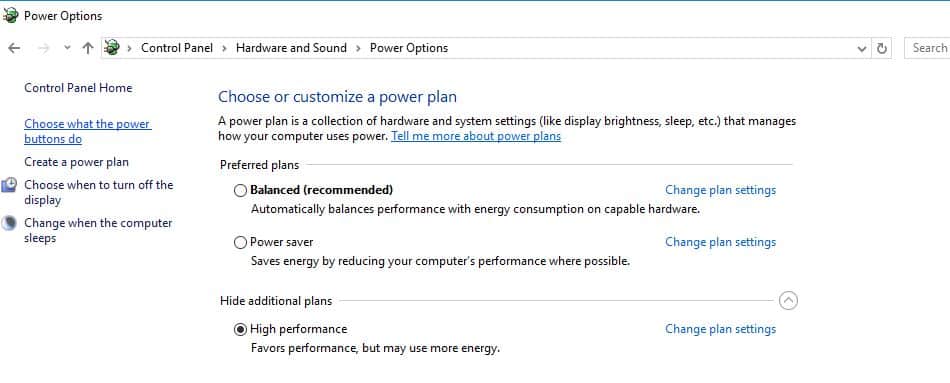
- Search for and select Power Options to see which power plan you are currently using.
- For better performance, make sure you are using a High Performance or Balanced plan (or a plan from the PC manufacturer that says it’s balanced).
- Again Select Change plan setting and Set the display’s sleep time as well as the computer’s sleep time to Never.

Update Graphics Driver
Outdated graphics drivers often times will not use the GPU efficiently. This can put the strain on your system’s processor, which in turn steals resources from your system. As a result, you may notice a decrease in performance on your PC. A simple solution to this is to make sure you keep your graphics drivers updated.
- Press Windows + X and select Device Manager,
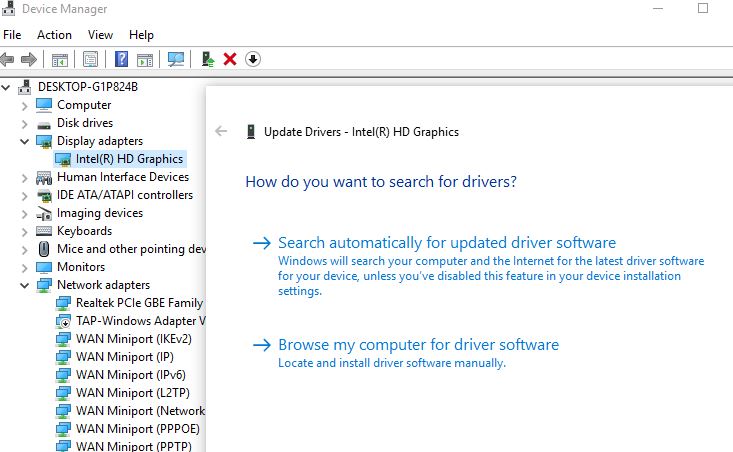
- Expand the display driver, Right-click on the installed graphics driver and select Update Driver Software.
- First, select the search driver automatically options to download and install the latest driver itself.
- If no driver is found, try updating the driver manually to do this visit the device manufacturer’s website to find the latest driver for your graphics controller and install it.

Run system file checker
Also corrupted, missing system files sometimes cause Different startup problems and Slow down the system performance. Especially after recent windows upgrade if system files get damaged or corrupted which may result buggy system performance. Run The System file checker ( SFC utility ) to make sure corrupted damaged system files not causing the issue.
- Open Command prompt as administrator,
- Type command sfc /scannow and press the enter key.
- This will scan the system for corrupted missing system files and restore them with the correct one.
- Restart Windows after 100% complete the scanning process.
- Now check Windows 10 running smoothly.
Did these solutions help to optimize windows 10 performance? Let us know on the comments below.
