3 Different Ways to Start your PC in safe mode in Windows 10

Safe Mode is a handy way to diagnose common issues with your PC, including Driver compatibility, unwanted malware and apps that prevent Windows start normally. There are many ways to start your PC in safe mode in Windows 10, whether you’re booting up or restarting the system. Here in this post, we have discovered how and when to use this essential Windows safe mode feature.
What is Safe mode in Windows 10?
Safe Mode is an inbuilt Troubleshooting feature, that allows users to enter an altered version of Windows and correct any problems that may be preventing them from entering booting up normally. This will start Windows into a basic state, using a limited set of files and drivers, disabling unnecessary drivers and programs during the startup process. This feature helps diagnose when programs and drivers that might not start correctly or that might prevent Windows from starting correctly.
Note: Safe mode is different from the normal operating mode in that it uses default drivers and settings upon startup and only system required software programs are loaded upon startup.
There are three different types of safe mode Options available on Windows.
- Boot Into Safe mode
- Safe Mode with Networking
- Safe Mode With the command prompt
The safe mode only starts with a very basic configuration and default drivers. Here you only have access to your Start Menu, as well as Mouse and Keyboard, and you will also be able to access your files.
Safe Mode with Networking load One extra set of drivers and networking drivers allow you to connect the computer to your network or the Internet.
And the Safe Mode with Command Prompt, you do not boot in the Windows GUI. You are directly given access to an open Command Prompt window.
How to Boot into Safe Mode On Windows 10
Windows has different ways to access the safe mode. On Windows 7 during the boot process, you can press the F8 key to access the Advanced options screen. Here use the up and down Arrow keys to Access the safe mode, safe mode with networking, or safe mode with command prompt.
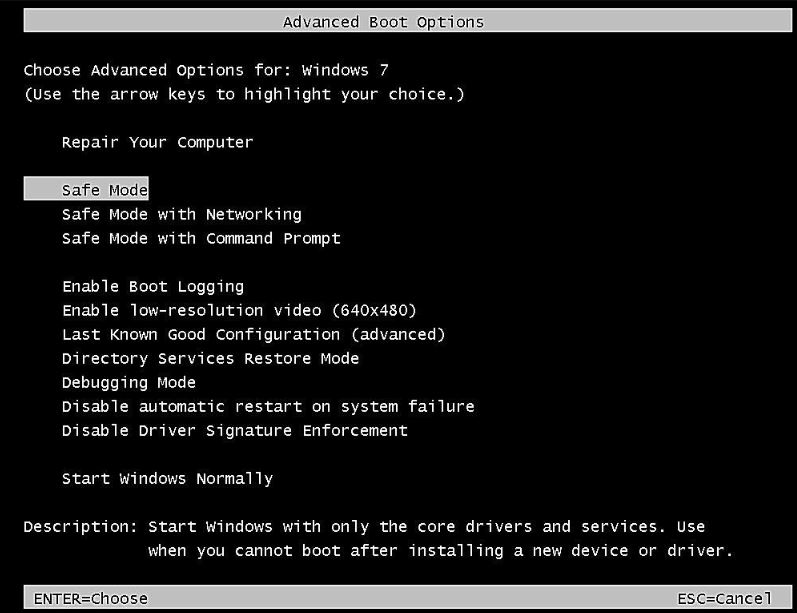
But In Windows 10 boot procedure has become faster than ever before, so this F8 option doesn’t work. But using some other ways you can access the safe mode on Windows 10. Here follow below.
Enter Safe Mode from Normal windows
If you have working Windows 10 And looking to enter safe mode.
- Press Windows + R, type msconfig and ok
- This will open the System Configuration panel
- Move to the boot Tab And Check the Safe Boot below Boot options.
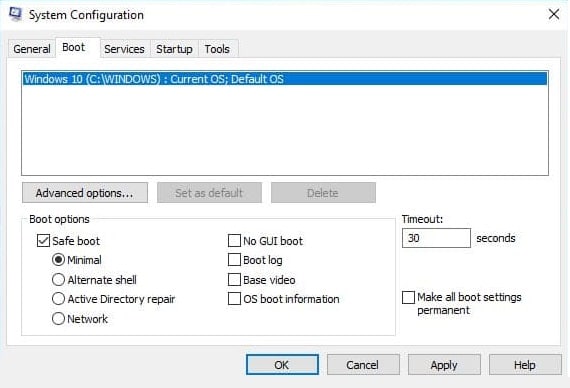
Here You can also choose from additional options.
- Minimal: Starts Safe Mode with the absolute minimal amount of drivers and services. With the standard Windows GUI (Graphical User Interface).
- Alternate Shell: Starts Safe Mode with a Command Prompt, without the Windows GUI. Requires knowledge of advanced text commands, as well as navigating the operating system without a mouse.
- Active Directory Repair: Starts Safe Mode with access to machine-specific information, such as hardware models. If we unsuccessfully install new hardware, corrupting the Active Directory, Safe Mode can be used to restore system stability by repairing corrupted data or adding new data to the directory.
- Network: Starts Safe Mode with the necessary services and drivers for networking, with the standard Windows GUI.
- Now Select the Minimal option and click Apply,
- When you restart your PC, this will start Windows 10 into safe mode.
How to Exit Safe Mode on Windows 10
After complete, the troubleshooting process Get out from safe mode is easy and simple. Follow the steps below to exit safe mode on Windows 10.
- Press Windows + R, type msconfig and ok,
- Under system configuration move to the boot tab
- Here uncheck the safe boot box below to Boot options.
- That’s all click apply and OK to make save changes.
- Windows will prompt Restart to take changes effect.
- When you Restart the system, this will boot Windows into normal mode.
Boot into safe mode when Windows 10 won’t boot
As Windows won’t start normally, we need Windows installation media to perform the below steps if you don’t have read how to create installation media for Windows 10.
- Now insert the Windows installation DVD/USB and boot from it.
- Note: You may need to change the first boot option (DVD or removable disk) on the BIOS setup.
- Skip the first screen and Click Repair Your Computer.

- Click Troubleshoot > Advanced Options
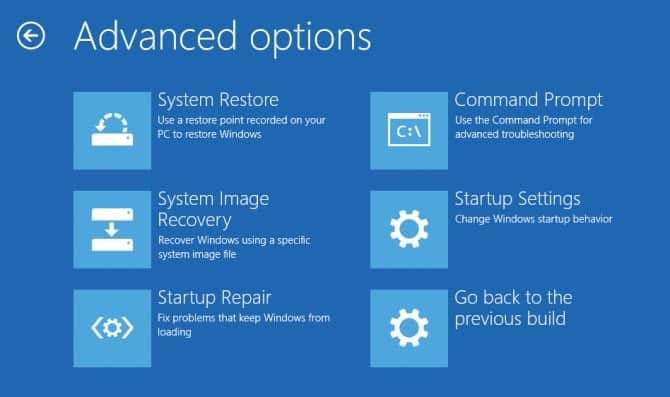
- Here select startup settings -> Then restart,
- The computer restarts and another screen opens, showing a list of different startup options.
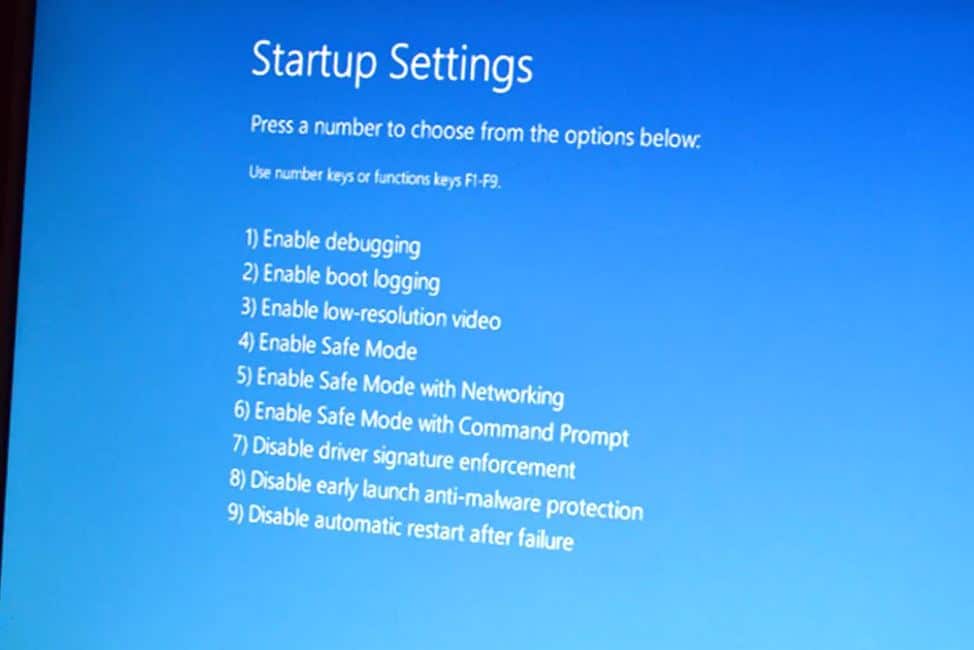
- Select F4 to start your PC in Safe Mode.
- if you’ll need to use the Internet, select F5 for Safe Mode with Networking,
- To enable “Safe Mode with Command Prompt,” press F6.
And after the troubleshooting completes simply Restart the windows to Boot into Normal Mode.
Enable F8 Safe Mode On Windows 10
By default, the F8 boot menu feature is disabled on Windows 10. But using Boot Configuration Data (BCD) Edit command, you can Enable the F8 Safe Mode boot menu in Windows 10. Here how
- Search for cmd on start menu search,
- Right-click on the command prompt, and select run as administrator.
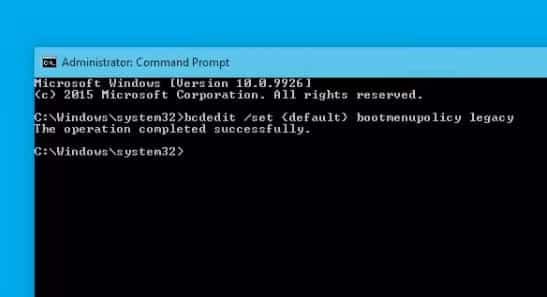
- Now type the following command and hit Enter.
- bcdedit /set {default} bootmenupolicy legacy
- You should now see a message stating, “The operation completed successfully.”
If Windows won’t start normally, then boot from installation media, skip the first screen and press Shift + F10 to open the command prompt.
Now Execute the following command to Enable F8 Safe Mode On Windows 10.
- C:
- bcdedit /set {default} bootmenupolicy legacy
- exit
Reboot your PC. Before the Windows logo appears, press F8 to access the Boot Options menu. Then select Safe Mode.

