Windows 10 start menu not working after Update? Here how to fix it
Is your Windows 10 Start menu not working, Start menu not responding or opening very slow where you are unable to select items from Start Menu? Here How to fix the Windows 10 Start menu if it's frozen.

Can’t open the start menu after the recent Windows 10 Update? Windows 10 Start menu Not Working or not opening even click several times on it? You are not alone a number of users report Windows 10 Start Menu hangs, freezes, stuck or becomes unresponsive, overall can’t use Start Menu after windows update. The reason may different it could be a buggy windows update, corrupted system files, third party programs especially the PC optimizers and more. Whatever the reason here we have few solutions you need to apply f Windows 10 Start menu is locking up or becoming generally unresponsive your PC or laptop.
Windows 10 Start Menu Not Working
If this is the first time you have noticed windows 10 start menu causing the problem, restart your PC probably helps if temporary glitch freezes the start menu.
Microsoft regularly releases windows updates with various security improvements and bug fixes and installs the latest windows updates fixes previous bugs as well. And installing the latest security patch may have the bug fix for this problem, let’s install windows updates following steps below.
- Press keyboard shortcut Windows + I to open the Settings app,
- Click on Update & Security then Windows update
- Now hit check for updates button to allow the download and install the latest windows updates from the Microsoft server.
- Once done restart your PC to apply the updates, now check if the start menu is back to normal.
Restart ShellExperienceHost
With latest Windows 10 version 1903 and later Microsoft provide an exclusive separate process called ShellExperienceHost.exe to Start Menu to overcome various probems with windows 10 start menu. You can check the new process yourself using Task Manager. If you still notice Windows 10 start menu not working as expected then
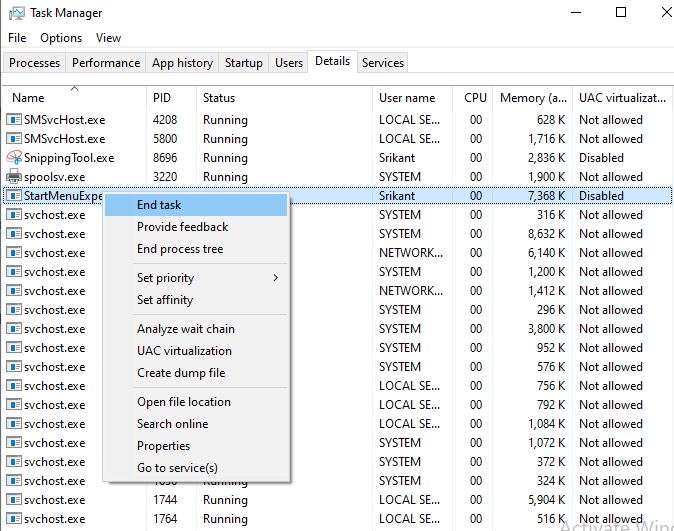
- Open taskmanager
- Under details tab locate StartMenuExperienceHost.exe
- Right click on StartMenuExperienceHost.exe and select end task from context menu.
- It’ll restart Start Menu process.
- Now Start Menu will become more responsive and you’ll notice a boost in Start Menu performance
Perform clean boot
Start windows into clean boot state that disable all non-Microsoft services and help you to find out if any File Explorer addon is interfering with the smooth functioning of explorer.exe which causes windows 10 start menu and Taskmanager not working.
- Press Windows icon + R to open Run box.
- Type msconfig and hit Enter.
- Go to the Services tab and put a check on Hide all Microsoft services and click Apply.
- Click Disable all.
- Click Apply then OK.
- Restart your computer.
Now check If the taskbar working properly then may any third-party applications causing the issue, Find out the application or Uninstall recently installed applications and check this may resolve the problem for you.
Check Application Identity Service
Make sure the Application Identity Service is running.
- Press Windows + R, type services.msc and click ok,
- This will open windows services console,
- Scroll down and locate Application Identity service,
- If its running state, right-click and select restart,
- If the Application Identity service not started, right-click on it select properties,
- Now change the startup type automatic and start the service next to service status,
- Click apply and ok to make save changes.
Re-register Windows 10 start menu
Here another effective solution that probably helps fix the dead start menu.
- Open an elevated PowerShell window,
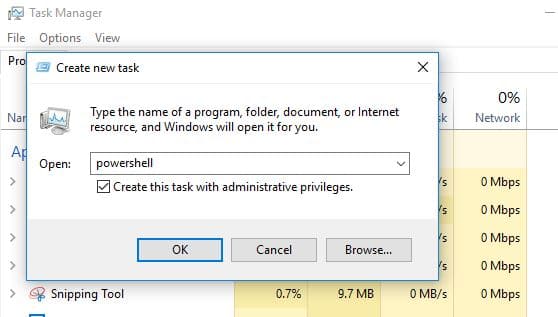
- To do this right click on the taskbar and open task manager. Or you can use keyboard shortcut Ctrl + Shift + Esc.
- Here on taskmanager click on file -> type PowerShell and checkmark on create this task with administrative privileges.
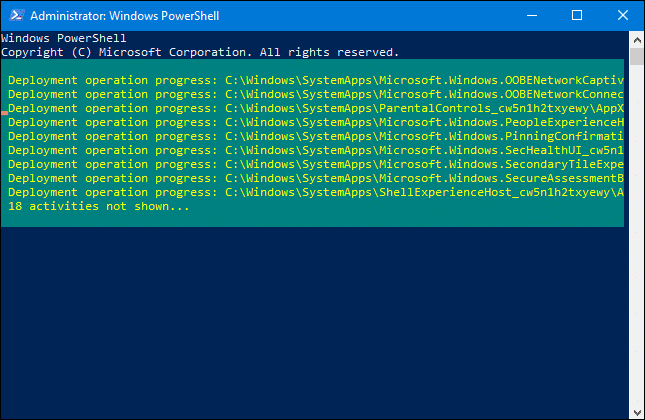
On PowerShell windows Type the following command and press Enter:
Get-AppXPackage -AllUsers | Foreach {Add-AppxPackage -DisableDevelopmentMode -Register “$($_.InstallLocation)\AppXManifest.xml”}
Wait until the app download and installation process completes ignore any red text that appears — and restart Windows. After that restart windows and check windows 10 Start menu working properly.
Tweak windows registry
- Press Windows key + R together to open Run.
- Write regedit in it and click OK to open Registry Editor.
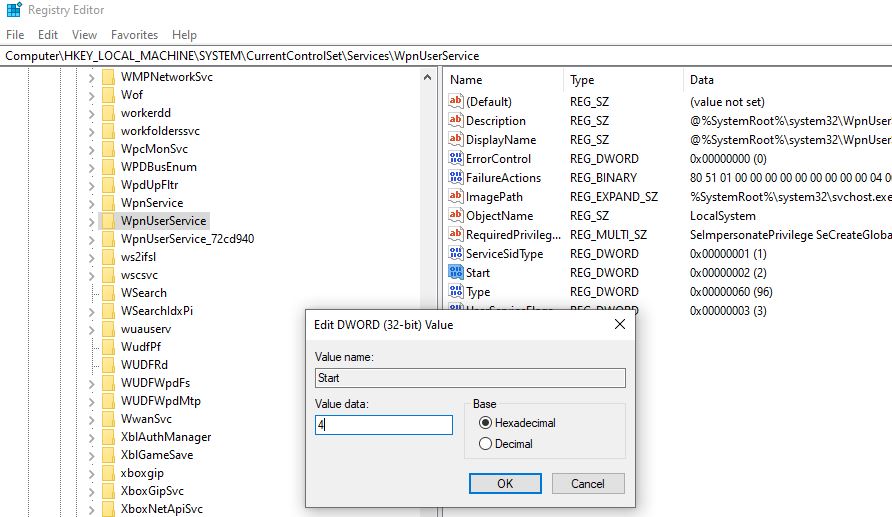
- Now navigate HKEY_LOCAL_MACHINE\SYSTEM\CurrentControlSet\Services\WpnUserService
- Locate start in the right side and Double Click on it to Modify it.
- Change the value to 4.
- Close the Registry Editor and Reboot your PC.
Run DISM And SFC Utility
Moreover, a corrupted system file or broken Windows file can also cause this since you just recently updated Windows. We recommend to check for any corrupted system files, by following steps below:
- Open command prompt as administrator (refer above steps we used task manager to open PowerShell as administrator)
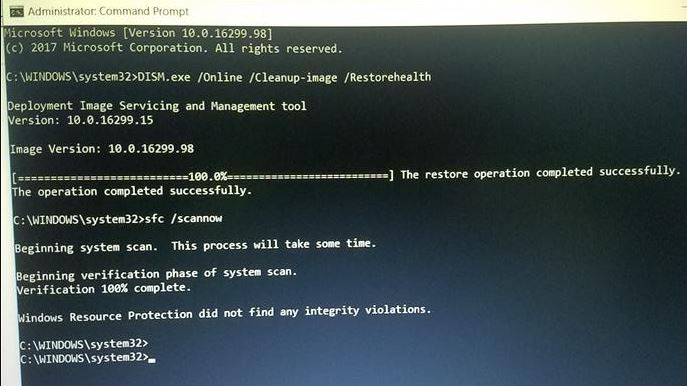
- Enter DISM.exe /Online /Cleanup-image /Restorehealth ( To Repair the System Image ) And wait until 100% complete the scanning process.
- After that type Enter sfc /scannow to run the System file checker utility which scans for corrupted, missing system files. If found any the SFC utility automatically restores them from a special folder located on %WinDir%\System32\dllcache, Wait until 100% complete the scanning process after that restart windows and check.
Create a new user account
Again sometimes corrupted user profiles also cause windows apps to struggle or not responding. Create a new user account following the steps below, log in with the newly created user account profile and check windows apps and start menu working properly or not.
In order to add a new user to your system,
- Open Settings with the help of Win + I.
- Choose Accounts from the setting option displayed.
- From the list shown, select Family & Other People.
- Now choose the option Add someone else to this PC under Other people.
- From the same list, choose, I don’t have this person’s sign-in information.
- On next screen click on Add a user without a Microsoft account
- Now just click on the add user option.
- After that, create the user and Click on Next
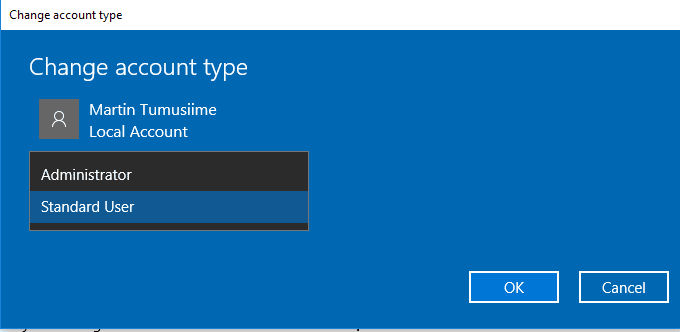
- Change the account type from the standard account to an administrator account and click on OK.
Now log off from the current user account and log into the new user account. The Start menu should now work, so you can change the new local account to a Microsoft account, and transfer your files and settings.
Perform System Restore
If all the above solutions didn’t fix the problem, Windows 10 Start menu not working then its time to utilize the System Restore feature. This option takes your PC back to an earlier point in time, called a system restore point. Restore points are generated when you install a new app, driver, or Windows update, and when you create a restore point manually. Restoring won’t affect your personal files, but it will remove apps, drivers, and updates installed after the restore point was made.
- Select the Start button, type control panel and then choose it from the list of results.
- Search Control Panel for Recovery.
- Select Recovery > Open System Restore > Next.
- Choose the restore point related to the problematic app, driver, or update, and then select Next > Finish.
Note: If you’re not seeing any restore points, it might be because system protection isn’t turned on. To check, go to the Control Panel, search for Recovery, and then select Recovery > Configure System Restore > Configure and make sure Turn on system protection is selected.
Did these solutions help fix windows 10 Start menu problems? Lets us know on comments below.

