Windows update cannot connect to the update service (solved)
Here is how to fix windows update error, We couldn't connect to the update service in Windows 10/11.

With Windows 10, Updates are set to install automatically whenever the device is connected to a Microsoft server. Usually, it’s a good idea where users never to miss the security patches as machines get always up to date. But sometimes due to some reason, Windows update fails to install updates automatically. Even manually checking updates results error message:
we couldn’t connect to the update service. We’ll try again later, or you can check now. If it still doesn’t work, make sure you’re connected to the internet.
This problem most probably occurs when the Windows temporary update folder (SoftwareDistribution folder) gets corrupted, Windows update service or its related service not running, security software blocking downloading updates, Windows system files get missing or corrupted, Or Your Internet connection disconnects frequently and more.
Couldn’t connect to the update service
If you are also struggling with this problem, “we couldn’t connect to the update service. We’ll try again later, or you can check now. If it still doesn’t work, make sure you’re connected to the internet.” Here we have collected some most applicable methods that fix almost every windows 10 update-related problems include update failed to install, windows update stuck checking, update stuck downloading or failed with different error codes, etc.
First of all check and make sure you have a stable internet connection to download updated files from the Microsoft server or Check how to fix network and Internet problems.
Temporarily disable Security software, Antivirus (if installed on your system). And also we recommend to Disable Proxy or VPN configuration if you have configured it on your machine.
If you’re getting a specific error, like 0x80200056 or 0x800F0922, then respectively it might be that your Internet connection got interrupted or you need to disable any VPN service you’ve got running.
Make sure your system-installed drive (Basically C driver) has free space to download updated files from the Microsoft server.
Also Open Settings -> Time & Language -> Select Region & Language from options on left. Here Verify your Country/Region is correct from the drop-down list.
Change DNS address
This problem is most probably related to Domain Name System (DNS) that makes it possible for you to open websites and access internet services. And the problem with DNS addresses can make services such as Windows Update temporarily unavailable.
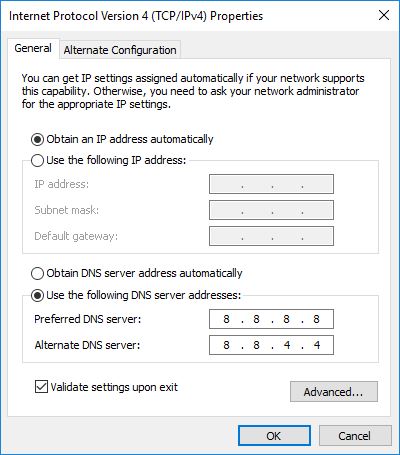
- Press Windows + R, type ncpa.cpl, and ok to open network connections window.
- Right-click the network interface which is in use. For example: right-click the connected ethernet adapter displayed on the screen. Select Properties.
- Double click on Internet Protocol Version 4 (TCP/IPv4) from the list to get its properties window.
- Here select the radio button Use the following DNS server addresses
- Preferred DNS server 8.8.8.8
- Alternate DNS server 8.8.4.4
- Click on validate settings upon exit and ok
- Now check for updates, there is no more Update service error

Windows Update troubleshooter
Run the Build in Windows update troubleshooter, and allow windows to check and fix the problem itself first. To run the Windows Update troubleshooter
- Press Windows + I to open the Settings window
- Click On Update & Security, then select Troubleshoot
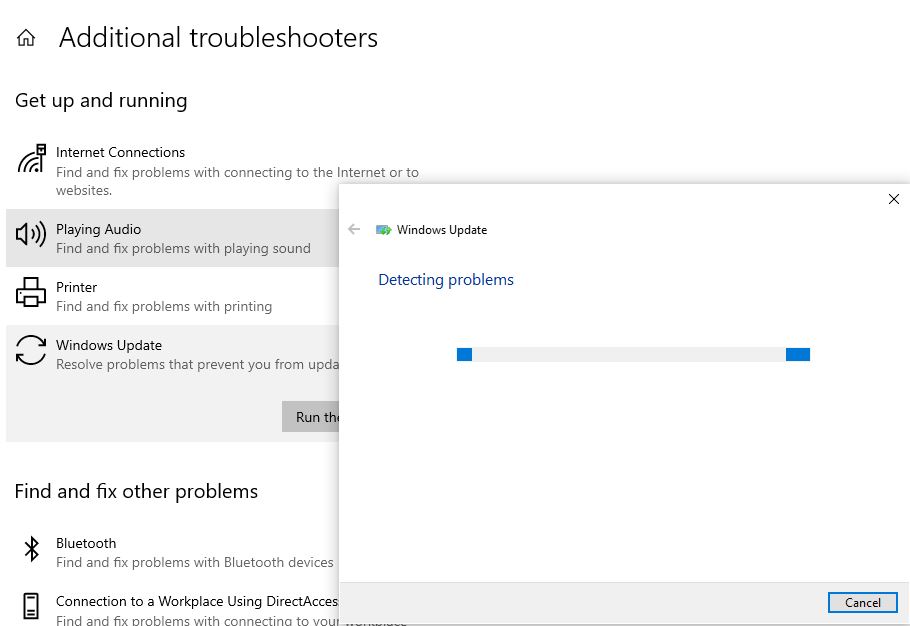
- Click on the additional troubleshooter link to list the available troubleshooter list,
- Scroll down and look for Windows update
- Click on it And Run the Troubleshooter

This will scant for problems prevents windows update to install If found any the troubleshooter automatically try to fix them for you.
Internet Connection troubleshooter
Again It may be possible that this is caused by an internet connection issue. Run the troubleshooter just to be sure. You can run the Internet troubleshooter, by following the same steps as from Settings > Update and Security > Troubleshoot > Internet Connections. Run the troubleshooter and let windows check and fix the problem for you.
After completing the process Restart windows and check again for Windows updates, let us know this helps or not.
Restart the Windows Update Service
If due for some reason, previously you have disabled the windows update service or its related services not running this may cause Windows Update to fail to install.
- Press Windows + R, type services.msc and ok, to open windows services.
- Scroll down and look for Service named Windows update.
- Double click on it to get its properties,
- Here look at the service status, Make sure it’s running and its startup type is set to automatic.
- Follow the same steps for its related services (BITS, Superfetch)
- Now check for updates, this may help.
Note: If these services already running we recommend restarting these services by right click on it and select restart.
Install the update in Safe Mode with Networking
Safe mode is a diagnostic mode of a computer operating system. It can also refer to a mode of operation by application software. In Windows, safe mode only allows essential system programs and services to start up at boot. Safe mode is intended to help fix most, if not all problems within an operating system. (Via Wikipedia) and Installing Updates on this mode will eliminate any conflicts that are causing the error.
To boot into safe mode with networking
- Press the Windows logo key + I on your keyboard to open Settings. If that doesn’t work, select the Start button in the lower-left corner of your screen, then select Settings.
- Select Update & security > Recovery.
- Under Advanced startup, select Restart now.
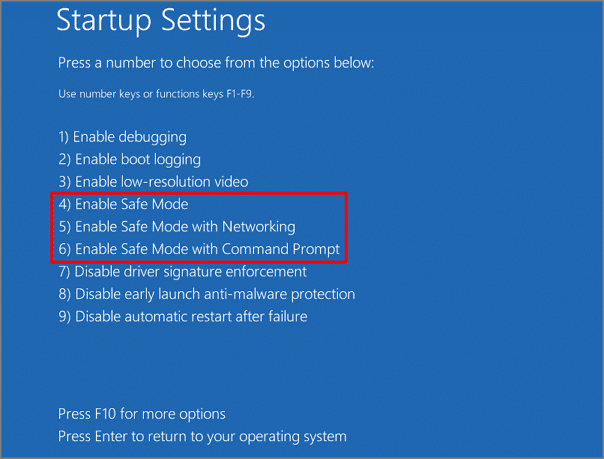
- After your PC restarts to the Choose an option screen, select Troubleshoot > Advanced options > Startup Settings > Restart.
- After your PC restarts, you’ll see a list of options. Select 4 or F4 to start your PC in Safe Mode. Or if you’ll need to use the Internet, select 5 or F5 for Safe Mode with Networking.

When system start safe mode, open settings -> update & security -> Windows Update and check for updates.
Clear Updates Download Folder
As discussed before, the Corrupted update cache (SoftwareDistribution folder) mostly causes Windows Update-related problems. Clear the update cache files and let windows download fresh files from the Microsoft server which mostly fix almost every window update-related problem. To do this
- First open Windows services (Services.msc)
- look for Windows Update service, right-click on select stop
- Do the same with BITS and Superfectch service.
- Then navigate to C:\Windows\SoftwareDistribution\Download
- Here delete everything within the folder, but do not delete the folder itself.
- You can do this press CTRL + A to select everything and then press Delete to remove the files.
- Again open the services window and restart the services, (windows update, BITS, Superfetch)
- Now check for updates, let us know if this helps or not.
Run System File Checker Utility
Again sometimes Missing Corrupted system files may be the possible cause why you’re unable to get an update. Run the System file checker utility that scans and restores if any missing corrupted system files causing the issue.
- Open the command prompt as administrator,
- Type sfc /scannow and hit the enter key.
- This will check for missing corrupted system files if found any the utility will restore them from %WinDir%\System32\dllcache.
- Wait until 100% complete the scanning process After that restart windows and check for updates.
- Also if the SFC scan fails to restore corrupted system files, simply run the DISM command which repairs the system image and enables SFC to do its job.
Did these solutions help to fix Windows 10 Update problem “we couldn’t connect to the update service. We’ll try again later, or you can check now. If it still doesn’t work, make sure you’re connected to the internet”? Which one works for you, let us know in the comments below.
