Your DNS Server Might Be Unavailable In Windows 10, 8.1 and 7

Experience problem with Internet connection after Windows 10 update? And running Network Diagnose results “Your DNS server might be unavailable (Not fixed)”. This is the result of an incorrect network configuration. If you are also having similar issue switch to Google DNS probably fix the problem on Windows 10, 8.1 and 7. Before start Lets first understand what is DNS on a Computer network and the use of DNS on Internet connection.
DNS Stand For Domain Name System, In Computer Networking DNS is a basic element for propagation. DNS simply resolves human-readable domain names into machine-readable IP forms, and vice versa. But if due to any reason, your machine can’t communicate with the DNS server, this might result from No internet access.
DNS Server Might Be Unavailable
- Power cycle both your router and computer
- Temporarily Disable Antivirus and Disconnect from VPN if configured,
- Press Windows + R, type ipconfig /flushdns and ok restart Windows and check if this helps.
Start DNS client service
- Press Windows + R, type services.msc and ok
- This will open the Windows services console,
- Scroll down and look for DNS client service,
- Right-click on the DNS client and start the service, (if not started)
- Also, double-clicking on DNS client service changes its startup type automatic or manual.
Reset Network configuration
This is another effective solution that probably helps to fix almost every Network & internet configuration problem.
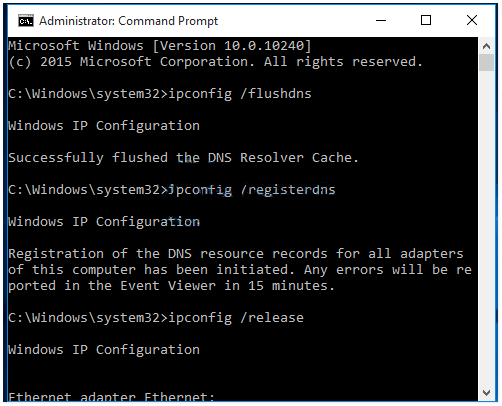
Open the Command prompt as administrator And perform the command below one by one.
- ipconfig /flushdns (To Flush and resets the contents of the DNS client resolver cache)
- ipconfig /registerdns (To register all related DNS entries)
- ipconfig /release (To Release The current IP Address)
- ipconfig /renew (To Renew A new IP Address From DHCP server)
- Netsh Winsock reset (To reset Winsock catalog back to default setting or clean state)

That’s All Now Type Exit to Close Command prompt and Restart windows compute the Take effect the changes that you applied through Commands.
Switch to Google DNS
- Press Windows + R, type ncpa.cpl and ok
- This will open the Network Connections window,
- Select and right-click on your primary / Active network adapter and choose Properties.
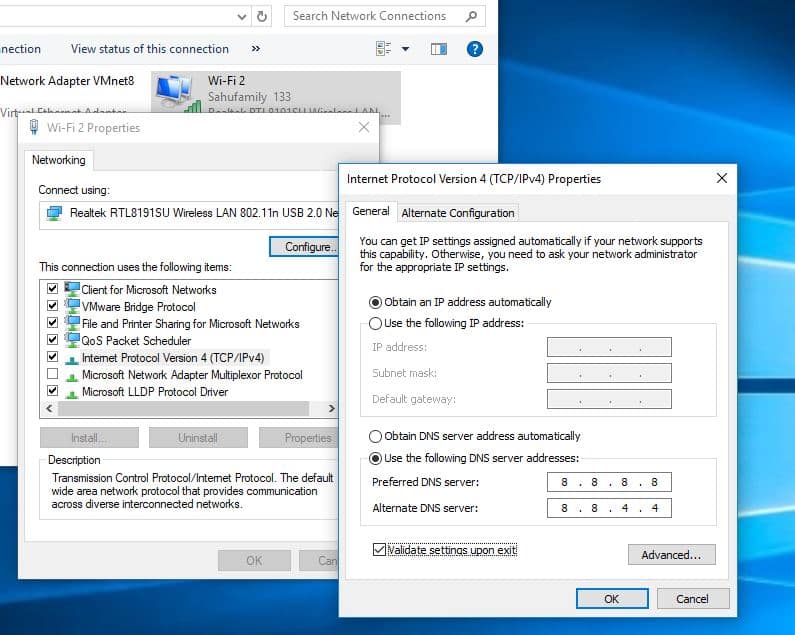
- Next, on the Ethernet property, double click on Internet Protocol Version 4 (TCP/IPv4)
- Select the radio button and Obtain an IP address automatically.
- Then select Use the following DNS server address and type Preferred DNS server as 8.8.8.8 and Alternate DNS server as 8.8.4.4.
These values are for the Google DNS server. If the Google DNS server address doesn’t work, you can use the OpenDNS server address. For that, use the respective values for Preferred DNS server as 208.67.222.222 and the Alternate DNS server as 208.67.220.220. Check Validate settings on exit option.

Click OK and the settings should be in effect with that, Now Check the Internet connection issue is solved, There is no more DNS Server that Might Be Unavailable, Or the DNS server not responding issue.
Disable Proxy
- Open control panel,
- Search for and select internet options,
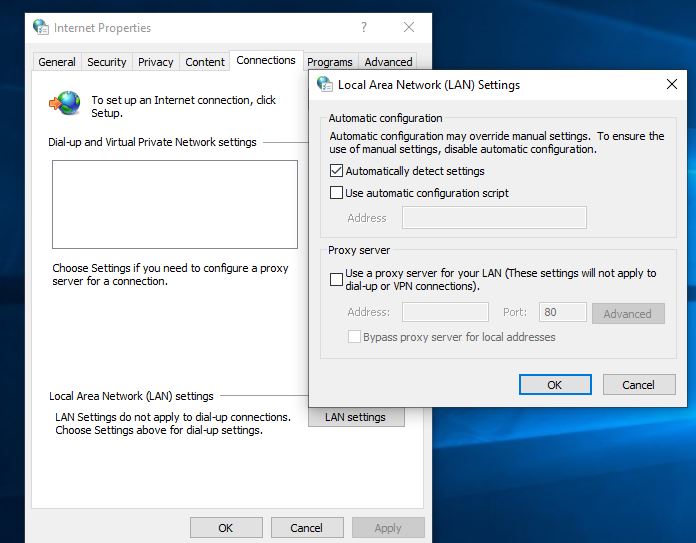
- Switch to the Connections tab and click on LAN settings,
- Here make sure the Automatically detect settings option is check marked,
- And Use a proxy server for your LAN is turned off.

Network Reset
If you are Windows 10 user, After performing solutions didn’t fix the problem. The network reset would be good solution that reset and reinstall the network adapter.
- Open Settings using the keyboard shortcut Windows + I
- Click on Network and Internet then select Status
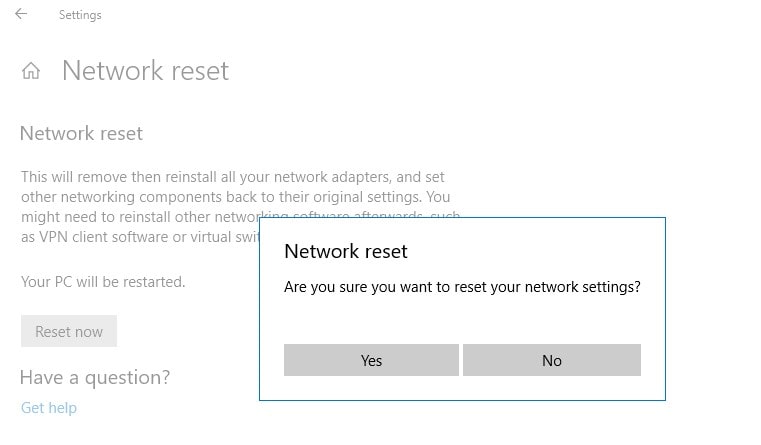
- Scroll down and click on Network Reset
- Again click Reset Now then after Restart Windows.

Did these solutions help to fix your DNS server might be unavailable on Windows 10? Let us know on the comments below.
