How to Flush DNS Cache in Windows 11 or windows 10

DNS ( Domain Name System) translates website names (that people understand) into IP addresses (that computers understand). Your PC ( Windows 10 ) stores DNS data locally to speed up the browsing experience. But there may come a time When you can’t get at a web page in spite of the page existing on the internet and is not in an outage state it is certainly a matter of annoyance. The situation indicates DNS Cache on the local server (machine) may be corrupted or broken. That cause you need to Flush DNS Cache to Fix This issue.
When need to Flush DNS cache?
DNS Cache (also known as DNS Resolver Cache) is a temporary database that is maintained by the computer’s operating system. It stores the location (IP addresses) of web servers that contain web pages that you have recently accessed. If the location of any web server changes before the entry in your DNS cache updates then you can no longer access that site.
So If you found Different Internet connection problems? Facing DNS issues or problems such as the DNS server is not responding, DNS might be unavailable. Or DNS cache may be corrupted due to any other reason that causes you to need to Flush DNS cache.
Also If your computer is finding it difficult to reach a certain website or server, the problem may be due to a corrupt local DNS cache. Sometimes bad results are cached, maybe due to DNS Cache Poisoning and Spoofing, and therefore need to be cleared from the cache in order to allow your Windows computer to communicate with the host correctly.
How to Flush DNS Cache on Windows 10
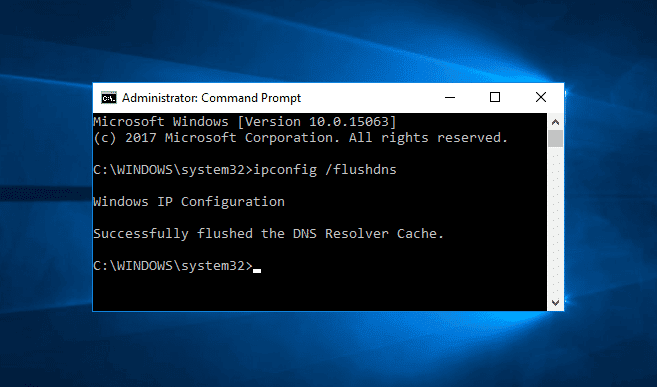
Clearing the DNS Cache can fix your internet connection problem. Here’s how you can flush the DNS cache in Windows 10 / 8 / 8.1 or Windows 7. First, you need to open a command prompt as administrator. To do this click on start menu search type cmd. And from search results right-click on the command prompt and select run as Administrator. Here on the command prompt Type the command below and hit enter key to execute the same.
ipconfig /flushdns

Now, the DNS cache will be flushed and you will see a confirmation message saying “Windows IP Configuration. Successfully flushed the DNS Resolver Cache.” That’s it!
The older DNS cache files have been removed from your Windows 10 computer which might have been causing the errors (like this website is not available or unable to load particular websites) while loading a webpage.
View DNS Cache in Windows 10
After flushing DNS cache, if you want to confirm that DNS cache has been cleared or not then you can apply the following command to view DNS cache on Windows 10 PC.
If you wish to confirm if the DNS cache has been cleared, you can type the following command and hit Enter:
ipconfig /displaydns
This will display the DNS cache entries if any.
How to Disable DNS Cache in Windows 10
For any reason, if you wish to disable DNS Cache for a while and enable it again then follow bellow steps.
Again first open the command prompt ( Admin ), And perform the command below to Disable DNS caching.
net stop dnscache
To turn on DNS caching, type net start dnscache and hit Enter.
Of course, when you restart the computer, the DNC caching will in any case be turned on.
One thing you need to keep in your mind is that this disabling DNS cache command is applicable for a particular session only and when you will restart your computer, the DNC caching will be enabled automatically.
How to flush Browser’s cache in Windows 10
We do a lot of internet browsing. Our browser web pages and other information in the browser’s cache so that it would be faster for it to fetch the webpage or website next time. It sure helps in faster browsing but over a period of a few months, it accumulates a lot of data that is no longer required. So, in order to speed up the internet browsing and overall performance of Windows, it’s a good idea to clear the browser cache from time to time.
Now, you might be using Microsoft edge browser or Google Chrome or Firefox, or any other web browser. The process of clearing cache for different browsers is a little different but easy.
Clear cache of Microsoft Edge browser: Click on the “…” present at the top right corner. Now navigate to Settings>>Choose what to clear. From there choose all the things you want to clear like browsing history, cached files & data, cookies, etc. Click “Clear”. You have successfully cleared the browser cache of the Edge browser.
Clear cache of Google Chrome browser: Navigate to Settings>>Show advanced settings>>privacy>>clear browsing data. Clear the cached files and images from the “beginning of time”. Doing this will clear the cache of your Google Chrome web browser.
Clear cache of Mozilla Firefox browser: To clear the cache files go to, Options>>Advanced>>Network. You will see an option saying Cached web content. Click “Clear Now” and it will clear the browser cache of Firefox.
I hope this topic is helpful to Clear DNS cache on windows 10,8.1,7. Have any queries, suggestions about this topic feel free to discuss on the comments below.
