Create Ubuntu bootable USB
Photo by Karolina Grabowska: https://www.pexels.com/photo/photo-of-a-person-s-hand-plugging-in-a-flash-drive-into-a-laptop-5882582/

Creating a bootable USB for Ubuntu 24.04.2 LTS “Noble Numbat”, released February 20, 2025, is a straightforward way to try or install this Long Term Support (LTS) Linux distribution on your PC. Whether you’re using Windows 11 or 10, tools like Rufus 4.7 (released April 9, 2025) or balenaEtcher make the process fast and reliable. This guide covers creating a bootable Ubuntu USB with Rufus, the most popular tool for Windows, and provides alternatives for flexibility. Use the USB to run Ubuntu as a live system or install it alongside Windows, with support until June 2029 (or 2034 with Ubuntu Pro).

What You’ll Need

  • USB Drive: 8GB minimum (16GB recommended for better performance).
  • Ubuntu ISO: Download Ubuntu 24.04.2 LTS from ubuntu.com/download.
  • Rufus Software: Get Rufus 4.7 from rufus.ie (portable version recommended).
  • Windows PC: Running Windows 11 or 10 (64-bit).
  • Backup: Save any data on the USB, as it will be erased.

Create Ubuntu 24.04.2 LTS Bootable USB with Rufus

Rufus 4.7, a free, open-source tool, is the fastest and most reliable way to create a bootable Ubuntu USB on Windows 11 or 10, supporting both UEFI and BIOS systems. Its intuitive interface, ZIP64 support for large ISOs, and persistent storage option make it ideal for Ubuntu 24.04.2 LTS, ensuring a seamless live USB or installation experience. Rufus automatically detects your system’s firmware, reducing setup errors, and its lightweight design minimizes resource usage.

  • Download Ubuntu ISO: Visit ubuntu.com/download and download the Ubuntu 24.04.2 LTS ISO (~5GB). Save it to your Downloads folder, not the USB. Verify the SHA256 checksum for security using a tool like Microsoft FCIV.
  • Download Rufus: Get Rufus 4.7 from rufus.ie. Choose the portable version (“rufus-4.7p.exe”) to run without installation, saving disk space.
  • Insert USB Drive: Plug in your USB (8 GB+, 16GB recommended for speed). Back up any data, as formatting will erase all contents.
  • Launch Rufus: Double-click the Rufus executable (no installation needed). Grant admin permissions via User Account Control for system access.

Configure Rufus:

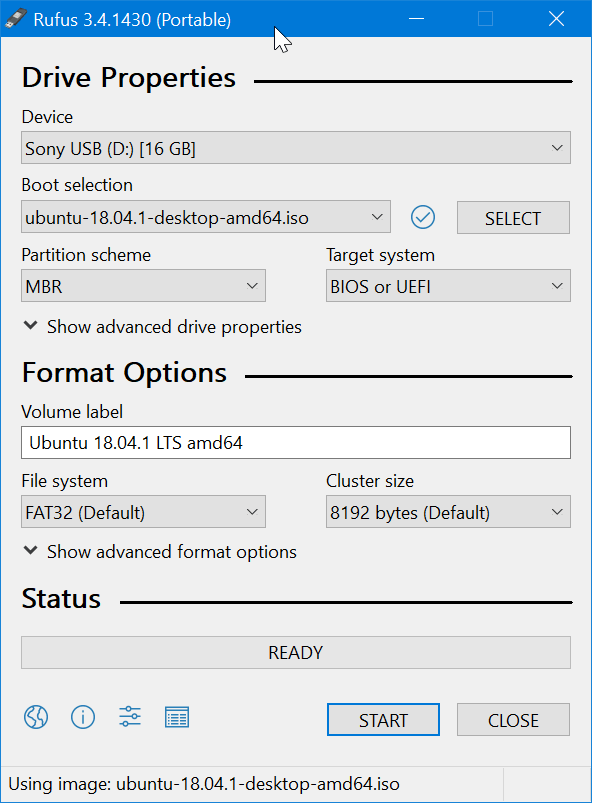
  • Device: Select your USB drive from the dropdown. Ensure no other USBs are connected to avoid errors.
  • Boot Selection: Click “SELECT” and browse to the Ubuntu 24.04.2 LTS ISO.
  • Partition Scheme: Rufus auto-selects GPT for UEFI or MBR for BIOS/UEFI; use GPT for modern PCs (post-2010).
  • File System: Select NTFS (default for Ubuntu ISOs) for compatibility with large files.
  • Persistent Storage (optional): Slide to allocate space (e.g., 4GB) for saving files and settings in live mode, perfect for portable testing.

Create Ubuntu 24 Bootable USB with Rufus

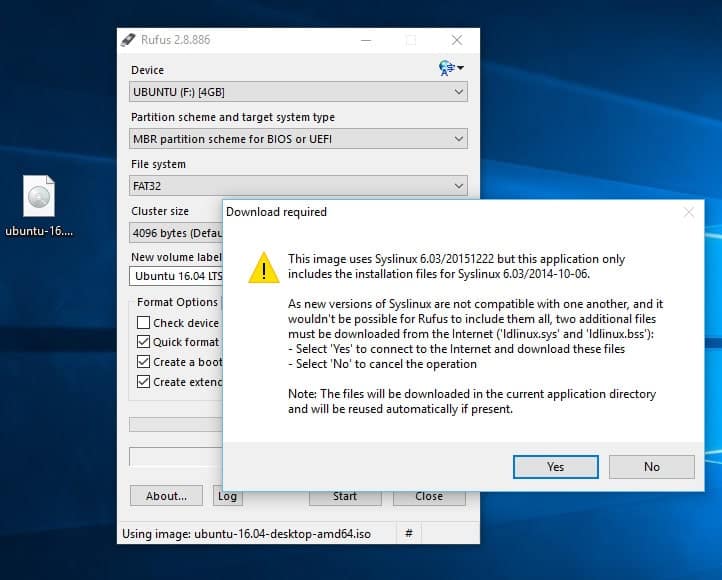
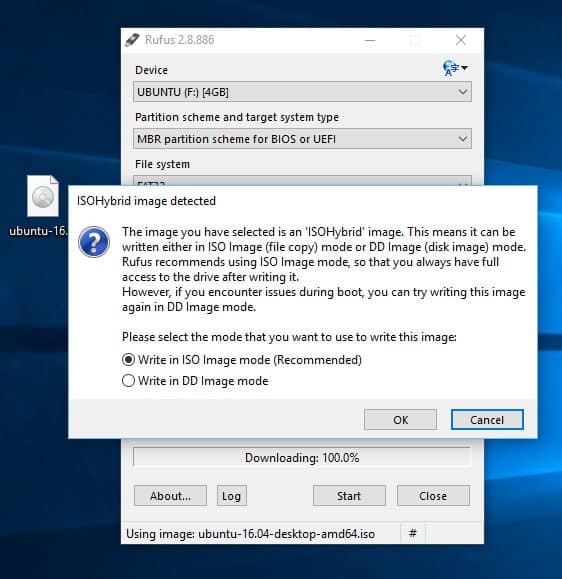
Start the Process: Click “START.” If an “ISOHybrid image detected” dialog appears, choose “Write in ISO Image mode” (recommended) and click “OK.” Rufus may download GRUB/Syslinux files (~1MB) for Ubuntu compatibility—click “Yes” if prompted.

Rufus download GRUB

Confirm Format: Click “OK” to format the USB and write the ISO. The process takes 5–15 minutes, faster with USB 3.0 ports and drives. A progress bar tracks completion.

Finish: When the status bar turns green with “READY,” click “CLOSE.” Safely eject the USB via Windows’ “Safely Remove Hardware” icon to prevent data corruption.

Launch Ubuntu: Insert the USB into your target PC, reboot, and press the boot menu key (e.g., F12, F2, or Esc) to select the USB. Try Ubuntu in live mode or install it. For detailed installation steps, see Ubuntu’s desktop tutorial.

Create Ubuntu Bootable USB with balenaEtcher

BalenaEtcher is a user-friendly, cross-platform tool officially recommended by Ubuntu for its simplicity and reliability in creating bootable USBs. Its minimal interface is perfect for beginners, requiring no advanced configuration, though it lacks persistent storage options. Etcher’s error-checking ensures the USB is correctly flashed, reducing boot failures, and its open-source nature aligns with Ubuntu’s ethos. Here’s how to use it:

  • Download balenaEtcher: Get the latest version from balena.io/etcher (~150MB). Choose the Windows installer for seamless integration.
  • Insert USB: Plug in your 8GB+ USB (16GB recommended for reliability). Back up data, as the USB will be erased during flashing.
  • Run balenaEtcher: Install Etcher and launch it. Grant admin permissions if prompted by Windows.
  • Select ISO: Click “Flash from file” and navigate to the Ubuntu 24.04.2 LTS ISO in your Downloads folder. Verify the file path to avoid selecting incorrect ISOs.
  • Select USB: Click “Select target” and choose your USB drive. Etcher lists only removable drives to prevent accidental formatting of internal disks.
  • Flash: Click “Flash!” to start writing the ISO. Etcher verifies the write process, taking 5–10 minutes depending on USB speed. A progress bar shows completion, followed by a validation check to ensure integrity.
  • Eject: When Etcher displays “Flash Complete,” safely remove the USB using Windows’ “Safely Remove Hardware” icon.
  • Note: Etcher is ideal for quick setups but doesn’t support persistent storage or multiboot. Use it for live USBs or direct installations. For advanced options, consider Rufus or Ventoy.

Create Multiboot USB with Ventoy

Ventoy is an advanced, open-source tool that creates a multiboot USB, allowing you to store and boot multiple ISOs (e.g., Ubuntu, Fedora, Mint) from one drive. Its unique approach eliminates the need to reformat the USB for each ISO, saving time and enabling flexible testing of Linux distributions. Ventoy supports both UEFI and BIOS, with a user-friendly boot menu, making it a favorite among power users.

  • Download Ventoy: Get the latest version from ventoy.net (~15MB). Choose the Windows ZIP file for easy extraction.
  • Insert USB: Plug in your 8GB+ USB (32 GB+ recommended for multiple ISOs). Back up data, as Ventoy will format the drive.
  • Install Ventoy: Extract the Ventoy ZIP, run Ventoy2Disk.exe as administrator, select your USB, and click “Install.” Ventoy creates two partitions: a small boot partition and a larger ISO storage partition (FAT32/exFAT).
  • Copy ISO: Open the ISO storage partition in File Explorer and copy the Ubuntu 24.04.2 LTS ISO to it. Add other ISOs (e.g., Linux Mint) as needed, up to the USB’s capacity.
  • Boot: Insert the USB, reboot your PC, and press the boot menu key (e.g., F12, F2). Select the USB to access Ventoy’s menu, then choose the Ubuntu ISO to boot. Ventoy supports persistence if configured in its advanced settings.

Key Features of Ubuntu 24.04.2 LTS

Ubuntu 24.04.2 LTS “Noble Numbat” offers a modern, secure Linux experience with Linux kernel 6.11 for cutting-edge hardware support, GNOME 46 for a polished desktop, and robust security features like FORTIFY_SOURCE=3. Its live USB mode and developer tools make it ideal for testing and coding.

  • Linux Kernel 6.11: Supports newer hardware (e.g., Raspberry Pi 5, AMD GPUs).
  • GNOME 46: Faster file searches, smoother animations, and tiling enhancements.
  • Security: FORTIFY_SOURCE=3 and unprivileged namespace restrictions for enterprise-grade safety.
  • Live USB: Test Ubuntu without installing, with optional persistent storage via Rufus.

Troubleshooting Tips

Here is how to resolve common bootable USB issues, such as undetected drives or boot failures, with practical solutions like formatting to FAT32, disabling Secure Boot, or verifying ISO integrity, ensuring a smooth Ubuntu setup.

  • USB Not Detected: Ensure the USB is formatted to FAT32 or NTFS before starting. Use Disk Management in Windows to check.
  • Boot Menu Access: Check your PC’s manual for the boot key (e.g., F12, F2). Disable Secure Boot in BIOS if needed.
  • Slow Process: Use a USB 3.0 port and drive for faster writing (Rufus supports USB 3.0+).
  • ISO Errors: Verify the ISO’s SHA256 checksum on Ubuntu’s download page to ensure it’s not corrupted.

FAQs About Creating Ubuntu 24.04.2 LTS Bootable USB

What’s the best tool for creating an Ubuntu bootable USB?
Rufus 4.7 is fastest and supports persistent storage, while balenaEtcher is simpler for beginners. Ventoy is ideal for multiboot USBs.

Can I create an Ubuntu bootable USB on Windows 11?
Yes, Rufus and balenaEtcher work seamlessly on Windows 11 and 10, with Rufus offering advanced options like persistence.

How long does it take to create the USB?
With Rufus, it takes 5–15 minutes, depending on your USB speed and PC. USB 3.0 is faster.

Can I use the USB for a live session?
Yes, Ubuntu’s live mode lets you test the OS without installing. Enable persistent storage in Rufus to save data between sessions.

What if my PC doesn’t boot from the USB?
Access the boot menu (e.g., F12), select the USB, and disable Secure Boot in BIOS if needed. Ensure the ISO is valid.

Kelvin smith
I am Kelvin smith founder of this blog. My qualification. completed Bachelor of Arts (BA) and Microsoft Certified Professional (MCP). With a strong background in computer applications love write articles on Microsoft Windows (11, 10, etc.) Cybersecurity, WordPress and more.