How to install the Windows Subsystem for Linux 2 (WSL2) on Windows 10

With the latest Windows 10 Microsoft has introduced the new Windows Subsystem for Linux version 2 (WSL 2). This is Microsoft’s next version of the Windows Subsystem for Linux and includes a genuine open-source Linux kernel based on version 4.19 from Kernel.org. As it uses a real Linux kernel, Linux apps will now have full access to their normal system calls. As Microsoft states in its blog WSL2 improves compatibility for Linux apps and better file system performance. WSL 2 is now using virtualization technology (based on Hyper-V) and uses a lightweight utility VM on a real Linux kernel. You can find out more about WSL 2 in the release blog or on the Microsoft Docs Page for WSL 2. Here in this post we show you how to install the Windows Subsystem for Linux 2 on Windows 10 machine.
- Enable the Windows Subsystem for Linux Optional feature (WSL 1 and WSL 2)
- Enable the ‘Virtual Machine Platform’ optional feature (WSL 2)
- Install a distro for the Windows Subsystem for Linux
- Configure the distro to use WSL 2
Install WSL2 on Windows 10
Note: Currently Windows Subsystem for Linux 2 (WSL2) is available only for devices running Windows 10 20H1 preview build 18917 and later.
To install WSL 2, you will need the following requirements:
- Windows 10 Insider Preview Build 18917 or higher
- A computer that supports Hyper-V Virtualization
Enable the Windows Subsystem for Linux
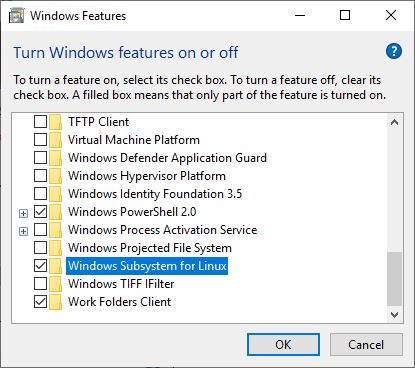
- From the start, menu search for and select Turn Windows features on or off,
- Checkmark on Windows Subsystem for Linux option,
- Click ok to allow windows to download and enable this feature,
- Also, make sure your pc is connected to the internet to download the following feature files from the Microsoft server.
- And restart windows after complete the process.

Enable the Virtual Machine Platform
- Also, you must enable virtualization in the computer’s BIOS Setup
- Power on the machine and open the BIOS (Press the Del key).
- Open the Processor submenu The processor settings menu may be hidden in the Chipset,
- Advanced CPU Configuration or Northbridge.
- Enable Intel Virtualization Technology (also known as Intel VT) or AMD-V depending on the brand of the processor.
Now let Windows start normally,
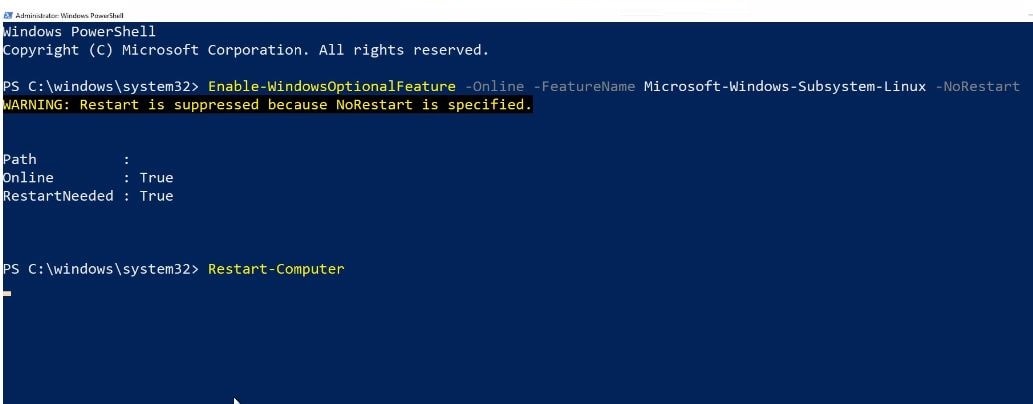
Open PowerShell as administrator, perform the following command and restart windows.
Enable-WindowsOptionalFeature -Online -FeatureName VirtualMachinePlatform
Install a distro for the Windows Subsystem for Linux
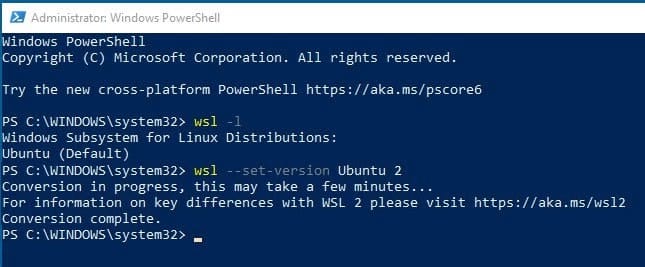
Now, let’s Set the WSL distro to use version 2, To this again open Powershell as administrator.
Run command wsl -l -v to list the available distros in PowerShell
Now run the command wsl –set-version [Distro] 2 to Pick the WSL distribution you wish to convert to WSL 2. For example, here I have the Ubuntu Linux distribution installed and I want to convert it to WSL 2 so the command is wsl –set-version Ubuntu 2
 You can run the command wsl –set-default-version 2 to set WSL 2 as the default.
Also use command wsl –list –verbose to verify the version of the distro.
Microsoft has also stated that in order to take advantage of the increased file system performance, you will need to place your Linux files in your Linux root file system.
Make sure to put the files that you will be accessing frequently with Linux applications inside of your Linux root file system to enjoy the file performance benefits. These files have to be inside of the Linux root file system to have faster file system access. We have also made it possible for Windows apps to access the Linux root file system (like File Explorer! Try running:
explorer.exe /in your bash shell and see what happens) which will make this transition significantly easier.
For a full list of changes between WSL 1 and WSL 2, you can read this Microsoft Docs page.

