Solved: We couldn’t connect to the update service windows 10

Windows 10 unable to get updates from Microsoft server? Windows update fails to install with differents like “We couldn’t connect to the update service. We’ll try again later, or you can check now. If it still doesn’t work, make sure you’re connected to the Internet. ” So if you’re sure you’re online or connected to the web and all your apps can work with the Internet but you still can’t check for Windows Updates, Here some effective solutions you may apply to get rid of this problem.
We couldn’t connect to the update service
First of all, make sure you have a working internet connection and your system is connected to the internet properly.
Temporarily disable Antivirus software and disconnect VPN is configured.
Start Windows 10 clean boot state and check for updates, if this time updates install successfully then there is any third-party service confliction causing the problem.
Check Date, Time & Region settings correct on your PC. Or you can verify the same from Settings, Time & Language -> Select Region & Language from options on left. Here Verify your Country/Region is correct from the drop-down list.
Change DNS Address manually
The Domain Name System plays a vital role to access internet services on your system. If its address is not correctly set, can cause Window Update temporarily unavailable issue. A number of users report Changing DNS address help to resolve the problem We couldn’t connect to the update service on windows 10.
To change DNS address on Windows PC
- Press Windows + R, type ncpa.cpl and press Enter.
- This will open the network connections window.
- Right-click on currently using the network interface icon and choose Properties.
- From the list, select Internet Protocol Version 4 (TCP/IPv4) and double click on the same.
- Now activate the radio button Use the following DNS server addresses and put the below number at the following location.
Preferred DNS server 8.8.8.8
Alternate DNS server 8.8.4.4
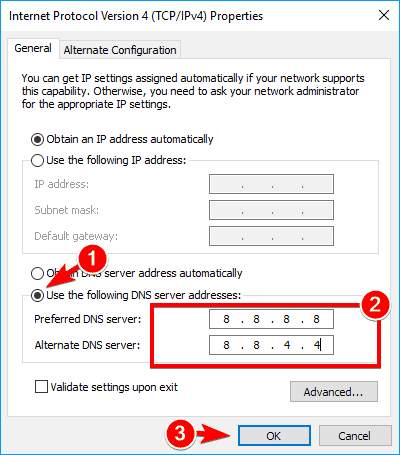
- Checkmark on validate settings upon exit option then OK to save changes.
That’s all, Close everything and check for updates, this most probably fixes the problem “we couldn’t connect to the update service” for you.
Still stuck with windows update installation try other solutions below.
Restart the Windows Update Service
This may have been caused by the Windows Update services being Stopped. Follow these steps to enable the service.
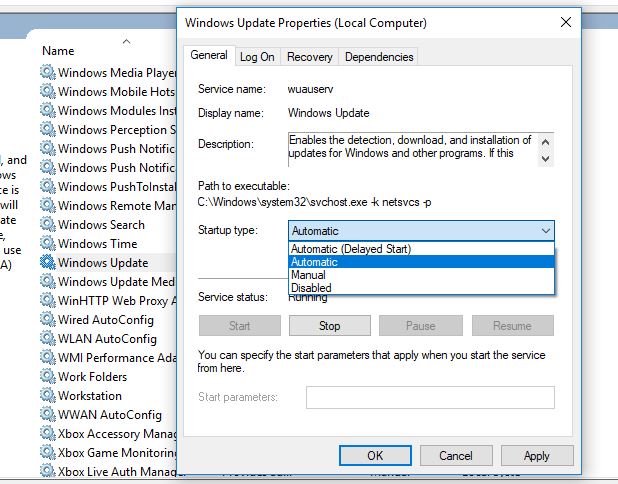
- Press the Windows key on your keyboard, type and click Services, and then look for Windows Update.
- Right-click Windows Update, and choose Properties.
- Look at the Service Status: and make sure if it’s running. Also, make sure that the Startup type is set to Automatic.
Run Windows Update Troubleshooter
Run Windows Update Troubleshooter, And let windows automatically fix the problem for you. Windows update troubleshooter will run and attempt to identify if any problems exist which prevent your computer from downloading and installing Windows Updates.
- Open Windows Settings (Windows + I)
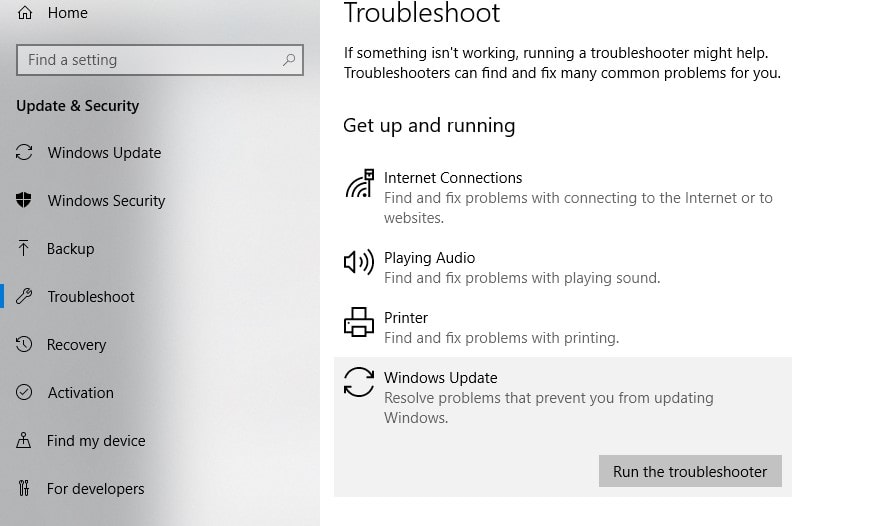
- Click on Update & Security then Troubleshoot.
- Here you find different troubleshooting tools to fix different problems.
- look for windows update troubleshooter
- click on it and run the troubleshooter button.
This will clear the Windows Update-related temporary files, clear the contents of the SoftwareDistribution folder, check the status of Windows Update-related Services, repair and reset Windows Update components, check for pending updates and more.
After complete, the process Restart windows and again check for updates.
Turn off Automatic proxy setup
This is another effective solution you may apply to check and fix “We couldn’t connect to the update service” problem.
- Press Windows key + I to open windows settings
- Select Network & Internet then Click on Proxy
- Here turn off Automatically detect settings.
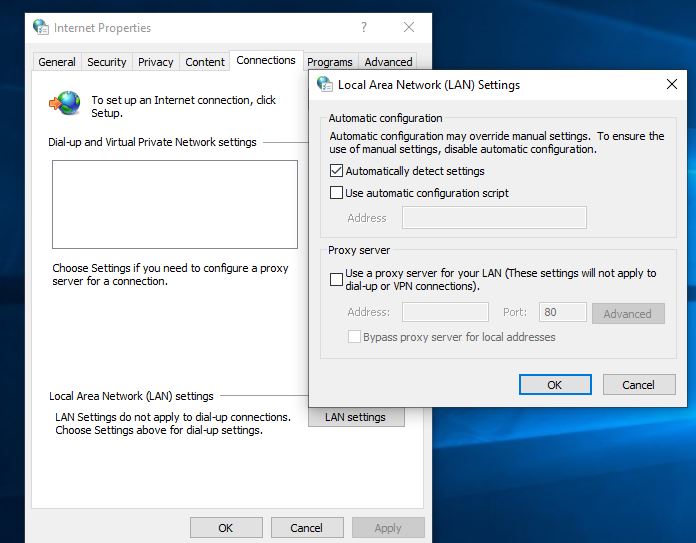
- Now press Windows + R, type inetcpl.cpl and ok.
- Move to the Connections tab, click LAN settings.
- uncheck, Use a proxy server for your LAN
- And make sure Checkmark on Automatically detect settings
Reset Windows Update components
If none above solutions work for you, Try manually Reset Windows Update components that fix almost every Windows update installation problem.
- Open Command prompt as Administrator
- Perform the command below to Stop the Background Intelligent Transfer Service (BITS), Windows Update service, and Cryptographic service.
- net stop bits
- net stop wuauserv
- net stop cryptsvc
- And minimize the command prompt window (we use the same later)
Now to clear the windows update cache
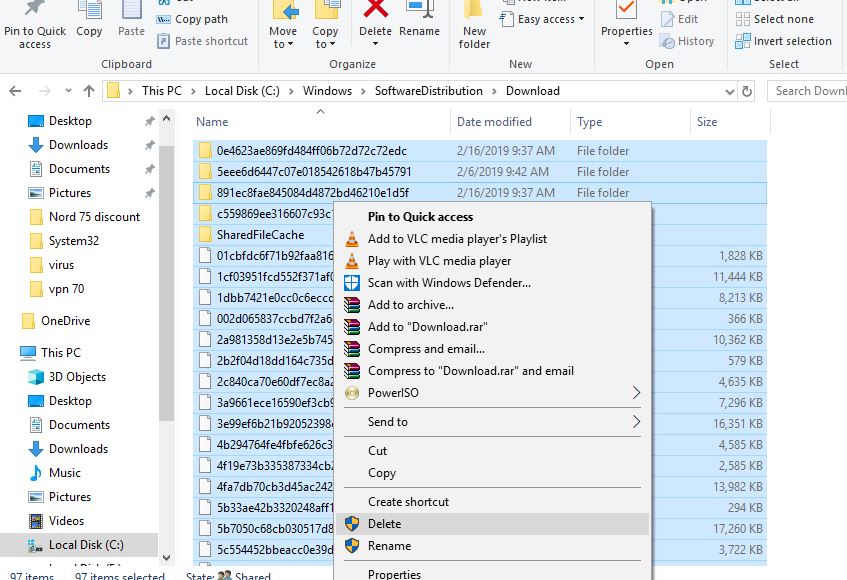
- Press “Windows + R,” enter the below path and press the Enter button.
- C:\Windows\SoftwareDistribution\
- This folder has all the files related to Windows updates.
- Open the “Download” folder, select all the files and delete all the files.
Again open the Command prompt window and perform the command below to Reset the network configurations that might be part of the problem.
netsh winsock reset
netsh winsock reset proxy
And restart the services that we previously stopped.
net start bits
net start wuauserv
net start cryptsvc
That’s all now close every window and restart your system, and check for updates. Did these solutions help to fix “we couldn’t connect to the update service” on windows 10? Let us know on comments below.
