How to fix search problems in windows 10 (Restart Or Reset Windows Search)
Windows 10 Search Not Working? If you’ve found that search is no longer working properly here few Troubleshooting tips to get you back on track

Windows 10 search not showing results, cannot type in the search box or the search function not working after recent windows update? Have you noticed search queries will show none or incomplete results, or you might experience search box in the taskbar turn unresponsive or won’t open at all? If you’re experiencing odd behavior while using search in Windows 10 such as unexpected or erroneous results, it could be down to a glitch that’s found its way into the system. Again corrupted system files or your device received a buggy update that breaks the experience.
Whatever the reason, If you’ve found that search is no longer working properly in Windows 10 here we have a variety of fixes you can try to get windows Search working again.
Windows search not working
If you’re looking for how to fix search problems in Windows 10, apply the solutions listed below.
Restart Search service
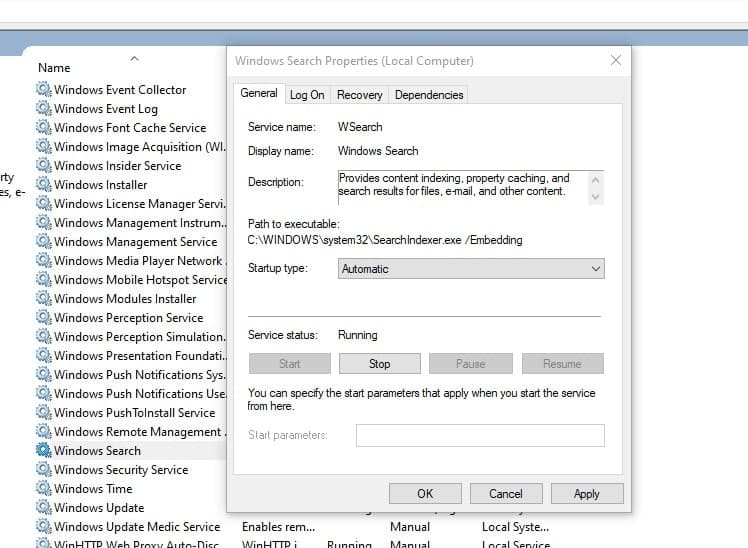
If the windows search service not started or stuck not responding you might experience problem windows search results. That’s why this is the very first thing you must check windows search service running or restart the windows search service following steps below.
- On your keyboard, press the Windows logo key and R at the same time, then type services.msc and click ok to open windows services console,
- Scroll down and locate Windows search, additionally Press W key to faster locate Windows Search option
- Check the service is running, if yes right click on Windows search service and select restart.
- If the service not started, then Right click on windows search select properties,
- Change the Startup type to Automatic, and then click OK to save the change and exit.

Install Latest Windows updates
Occasionally windows updates cause different problems or might this search problem causing because of buggy update. But these are usually addressed quickly by Microsoft, with patches made available as soon as possible. To ensure you have these fixes you’ll need to be running the latest version of Windows 10.
- Open the Start Menu and navigate to Settings
- Click Update & Security then Windows Update
- Now click on Check for updates. If you find that an update is available, download and install it
- Once done restart your PC to apply the changes and see if that clears the problem.
Use the built-in Troubleshooter
If you’ve already installed the latest updates to Windows 10 but this hasn’t had the desired effect, you can move onto the troubleshooter software that comes built-in to the OS. Run the Windows search troubleshooter following steps below and let windows detect and fix the problem itseft.
- Open the Start Menu and go to Settings
- Update & Security then troubleshoot,
- Now scroll down until you find Search and Indexing.
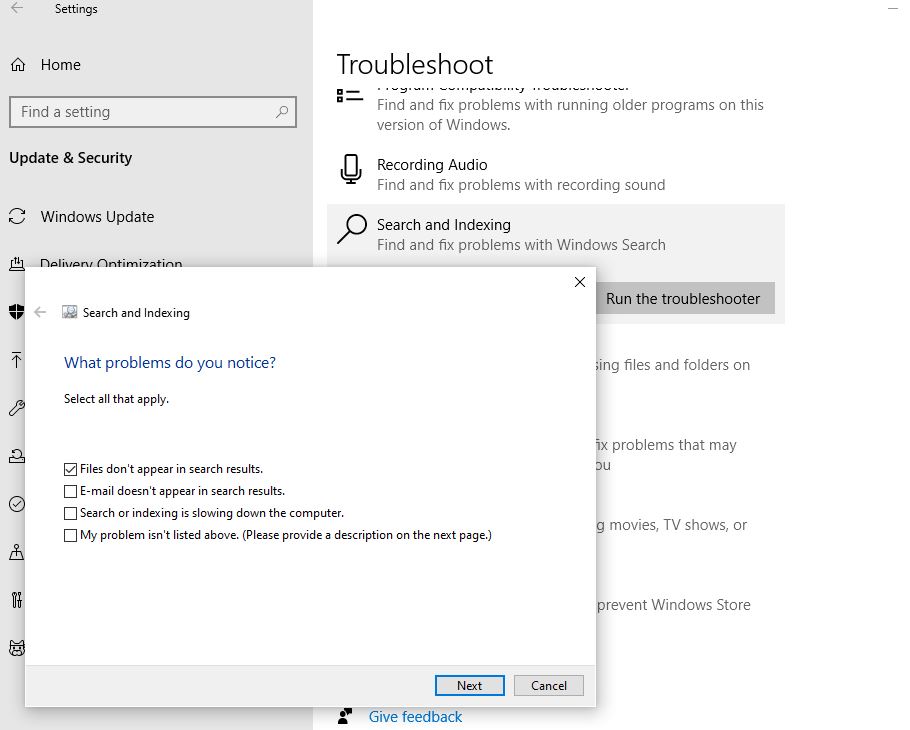
- Select this and then click Run the troubleshooter.
Windows will now present you with a list of potential issues that could be happening. Select the ones that apply to your system, then click Next to begin the process. Hopefully, Windows will be able to correct any errors and bring the search feature back to full functionality in a matter of minutes.

Reset the search software
If you tried the first step listed above, then you should be on the latest version of Windows 10. So, for resetting search you’ll need to download a small program from Microsoft called Reset Windows Search PowerShell script.
Once this is done, right-click on the program and choose the Run with PowerShell option. You’ll be asked if you want the program to be able to make changes to Windows? Say Yes, then the software will run and let you know once the process is finished. You may wish to also restart Windows 10 then see if your search woes are now firmly in the past.
- Download the “ResetWindowsSearchBox.ps1” script from the Microsoft Download Center, and save the file to a local folder:
- Right-click the file that you saved, and select Run with PowerShell.
- If you are asked “Do you want to allow this app to make changes to your device?,” select Yes.
- The PowerShell script resets the Windows Search feature. When the word “Done” appears, close the PowerShell window
Rebuild indexing services
The way Windows 10 indexes the files and folders on your PC can sometimes cause problems that makes searching in Windows 10 not work the way it should, so if none of the other steps have worked, this is worth trying.
- To fix certain Windows 10 search problems, you need to rebuild Windows 10’s index database. To do this, once again open the Settings app, and click ‘Search’.
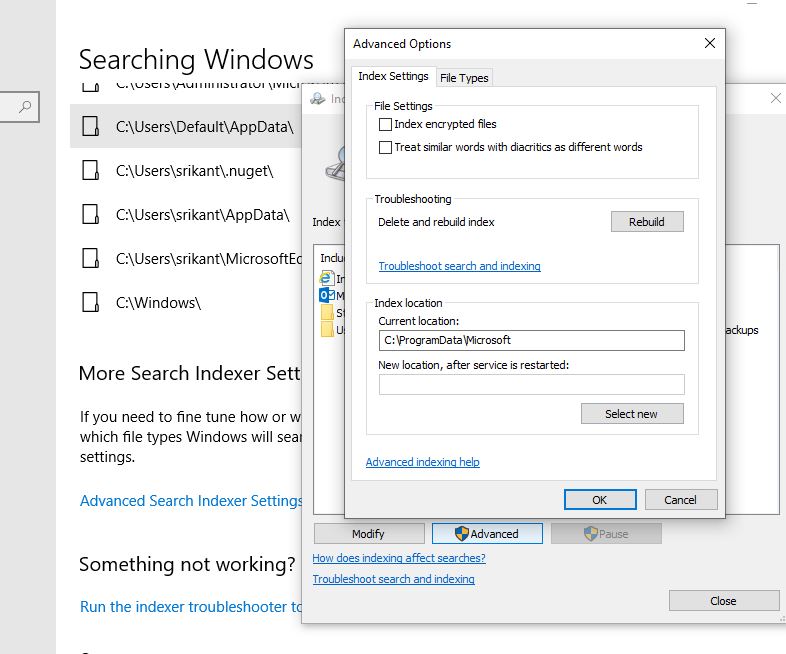
- On the left-hand menu, click ‘Searching Windows’, then under where it says “More Search Indexer Settings”, click ‘Advanced Search Indexer Settings.’
- Click the ‘Advanced’ button in the next window that appears, then click the ‘Rebuild’ button. Click ‘OK’ and let Windows 10 do its thing.

Repair Windows System Files
Again if windows system files corrupted you might experience different problems include the search results not showing. Repair Windows 10 using the DISM and SFC commands probably help resolve the search problems as well.
- Open Command Prompt as Administrator
- In command prompt give the following dism command and press Enter:
- DISM.exe /Online /Cleanup-image /Restorehealth
- When the DISM operation is completed, type sfc /scannow command and hit Enter:
- Now, wait until the System File Checker repairs the Windows System Files.
- Once the scanning process completes 100% restart your computer and try to perform a search.
Create a new User Account
Few users report create a new user account help them resolve the windows search problem. Chances there the current user profile corrupted, create new user account and check if this help fix the windows search problem on windows 10.
- Open Settings using keyboard shortcut Windows + I.
- Click Accounts then Select Family & other users on the left
- Next click Add someone else on this PC.
- At ‘How will this person sign in’ screen, click “I don’t have this person’s sign-in information”.
- At ‘Let’s create your account’ screen, click at “Add a user without a Microsoft account”.
- Type a username (& password if you want) & click Next.
- Then click at the new user and select the Change account type button.
- Set the new user as Administrator & hit OK.
- Sign-out from your account and sign-in with the new user account.
- Check if the search problem resolved or not.
Did these solutions help fix search problems in windows 10? Let us know on comments below.
